Newcomer Onboarding Guide
This is a single-page onboarding guide for a new Voicing AI platform user. It explains the main platform sections, the basic setup flow, how to create and use key items, and how to review performance after calls.
Use this guide during a live onboarding session, or open it in the browser and export it as a PDF.
Table of Contents
- Overview
- Login and Workspace Selection
- Platform Navigation
- Basic Onboarding Flow
- Creating or Selecting an Assistant
- Using Pathways
- Using Knowledge Base
- Using Tools
- Running Campaigns
- Checking Analytics
- API Flow
- Practical Example: New User Onboarding Flow
- Screenshot Reference
- Downloadable Version
- Troubleshooting
- Best Practices
1. Overview
Voicing AI helps teams create voice assistants, connect them to knowledge and tools, run calls or campaigns, and review results from analytics.
The basic workflow is:
- Select the correct workspace.
- Create or choose an assistant.
- Configure prompt, voice, and basic settings.
- Add a Knowledge Base if the assistant needs company information.
- Add tools if the assistant must fetch or update data.
- Create a pathway for call flow.
- Add contacts for campaigns.
- Run test calls or campaigns.
- Check analytics and improve the setup.
2. Login and Workspace Selection
- Open the Voicing AI platform URL in your browser (for example,
https://app.voicing.ai/login/). - On the login page, enter your Email Address and Password, then click Login.
- If your organization uses Microsoft SSO, click Sign in with Microsoft instead.
- After login, if you have access to multiple workspaces or organizations, select the workspace assigned to your team or project.
- Before creating or editing anything, confirm you are in the correct workspace.
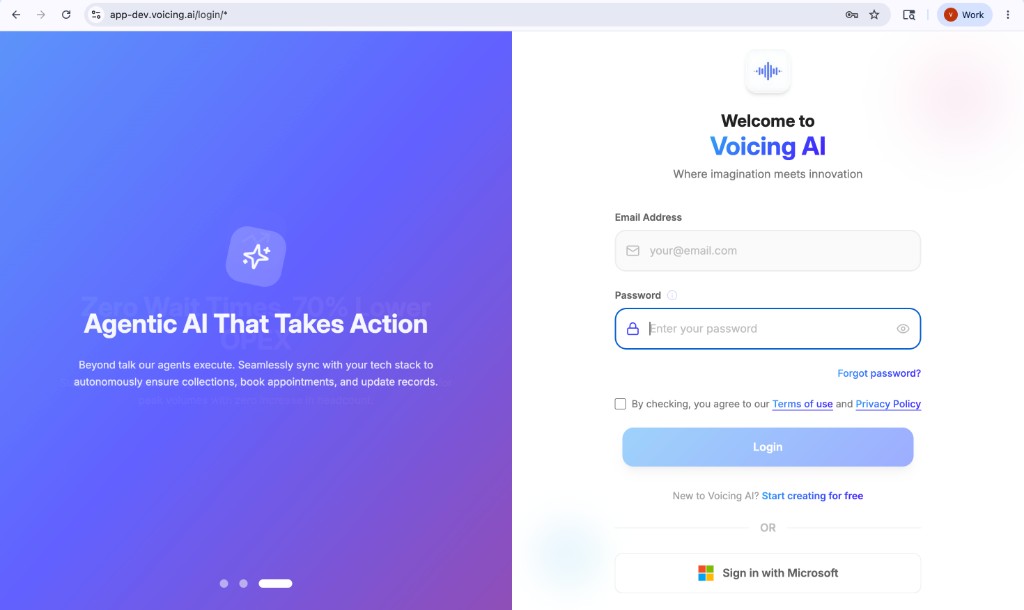
Check these items after login:
| Check | Why it matters |
|---|---|
| Correct workspace name | Prevents changes in the wrong organization. |
| Expected platform tabs are visible | Confirms you have the right access. |
| Assistants and campaigns are visible | Confirms you can start the onboarding flow. |
3. Platform Navigation
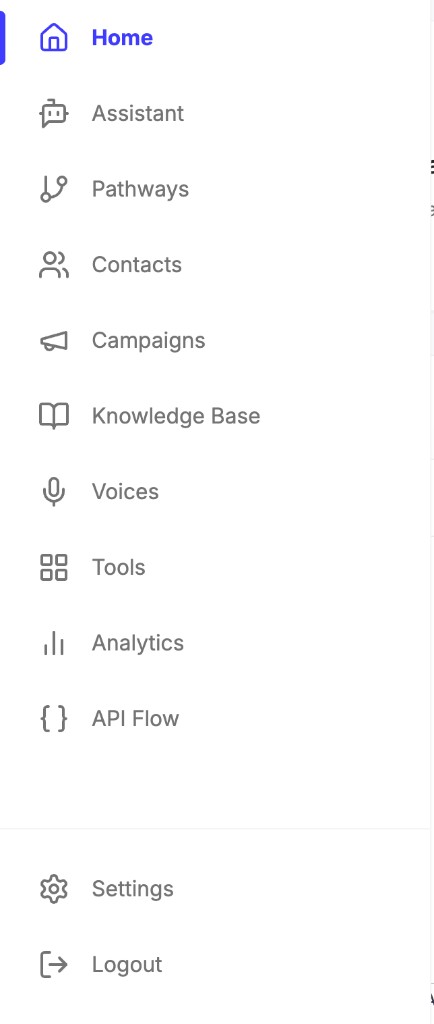
Use the left sidebar to move around the platform. Tabs appear from top to bottom in this order:
| Order | Platform tab | Beginner-friendly meaning |
|---|---|---|
| 1 | Home | Landing page and workspace overview after login. |
| 2 | Assistant | Create and manage voice AI agents that speak with users. |
| 3 | Pathways | Build the step-by-step call flow the assistant follows. |
| 4 | Contacts | Store and organize people or phone numbers for outreach. |
| 5 | Campaigns | Run outbound calling campaigns using contacts and assistants. |
| 6 | Knowledge Base | Upload documents, FAQs, policies, and product information. |
| 7 | Voices | Browse, preview, and select voices for assistants. |
| 8 | Tools | Connect actions like fetching ticket status or creating records. |
| 9 | Analytics | Review call performance, results, transcripts, and outcomes. |
| 10 | API Flow | View and use APIs for outbound calls, call details, and integrations. |
| 11 | Settings | Manage workspace configuration, users, and account options. |
| 12 | Logout | Sign out of the platform when you are done. |
Sidebar reference (visual):
4. Basic Onboarding Flow
For the first setup, follow this order:
- Create or select an assistant.
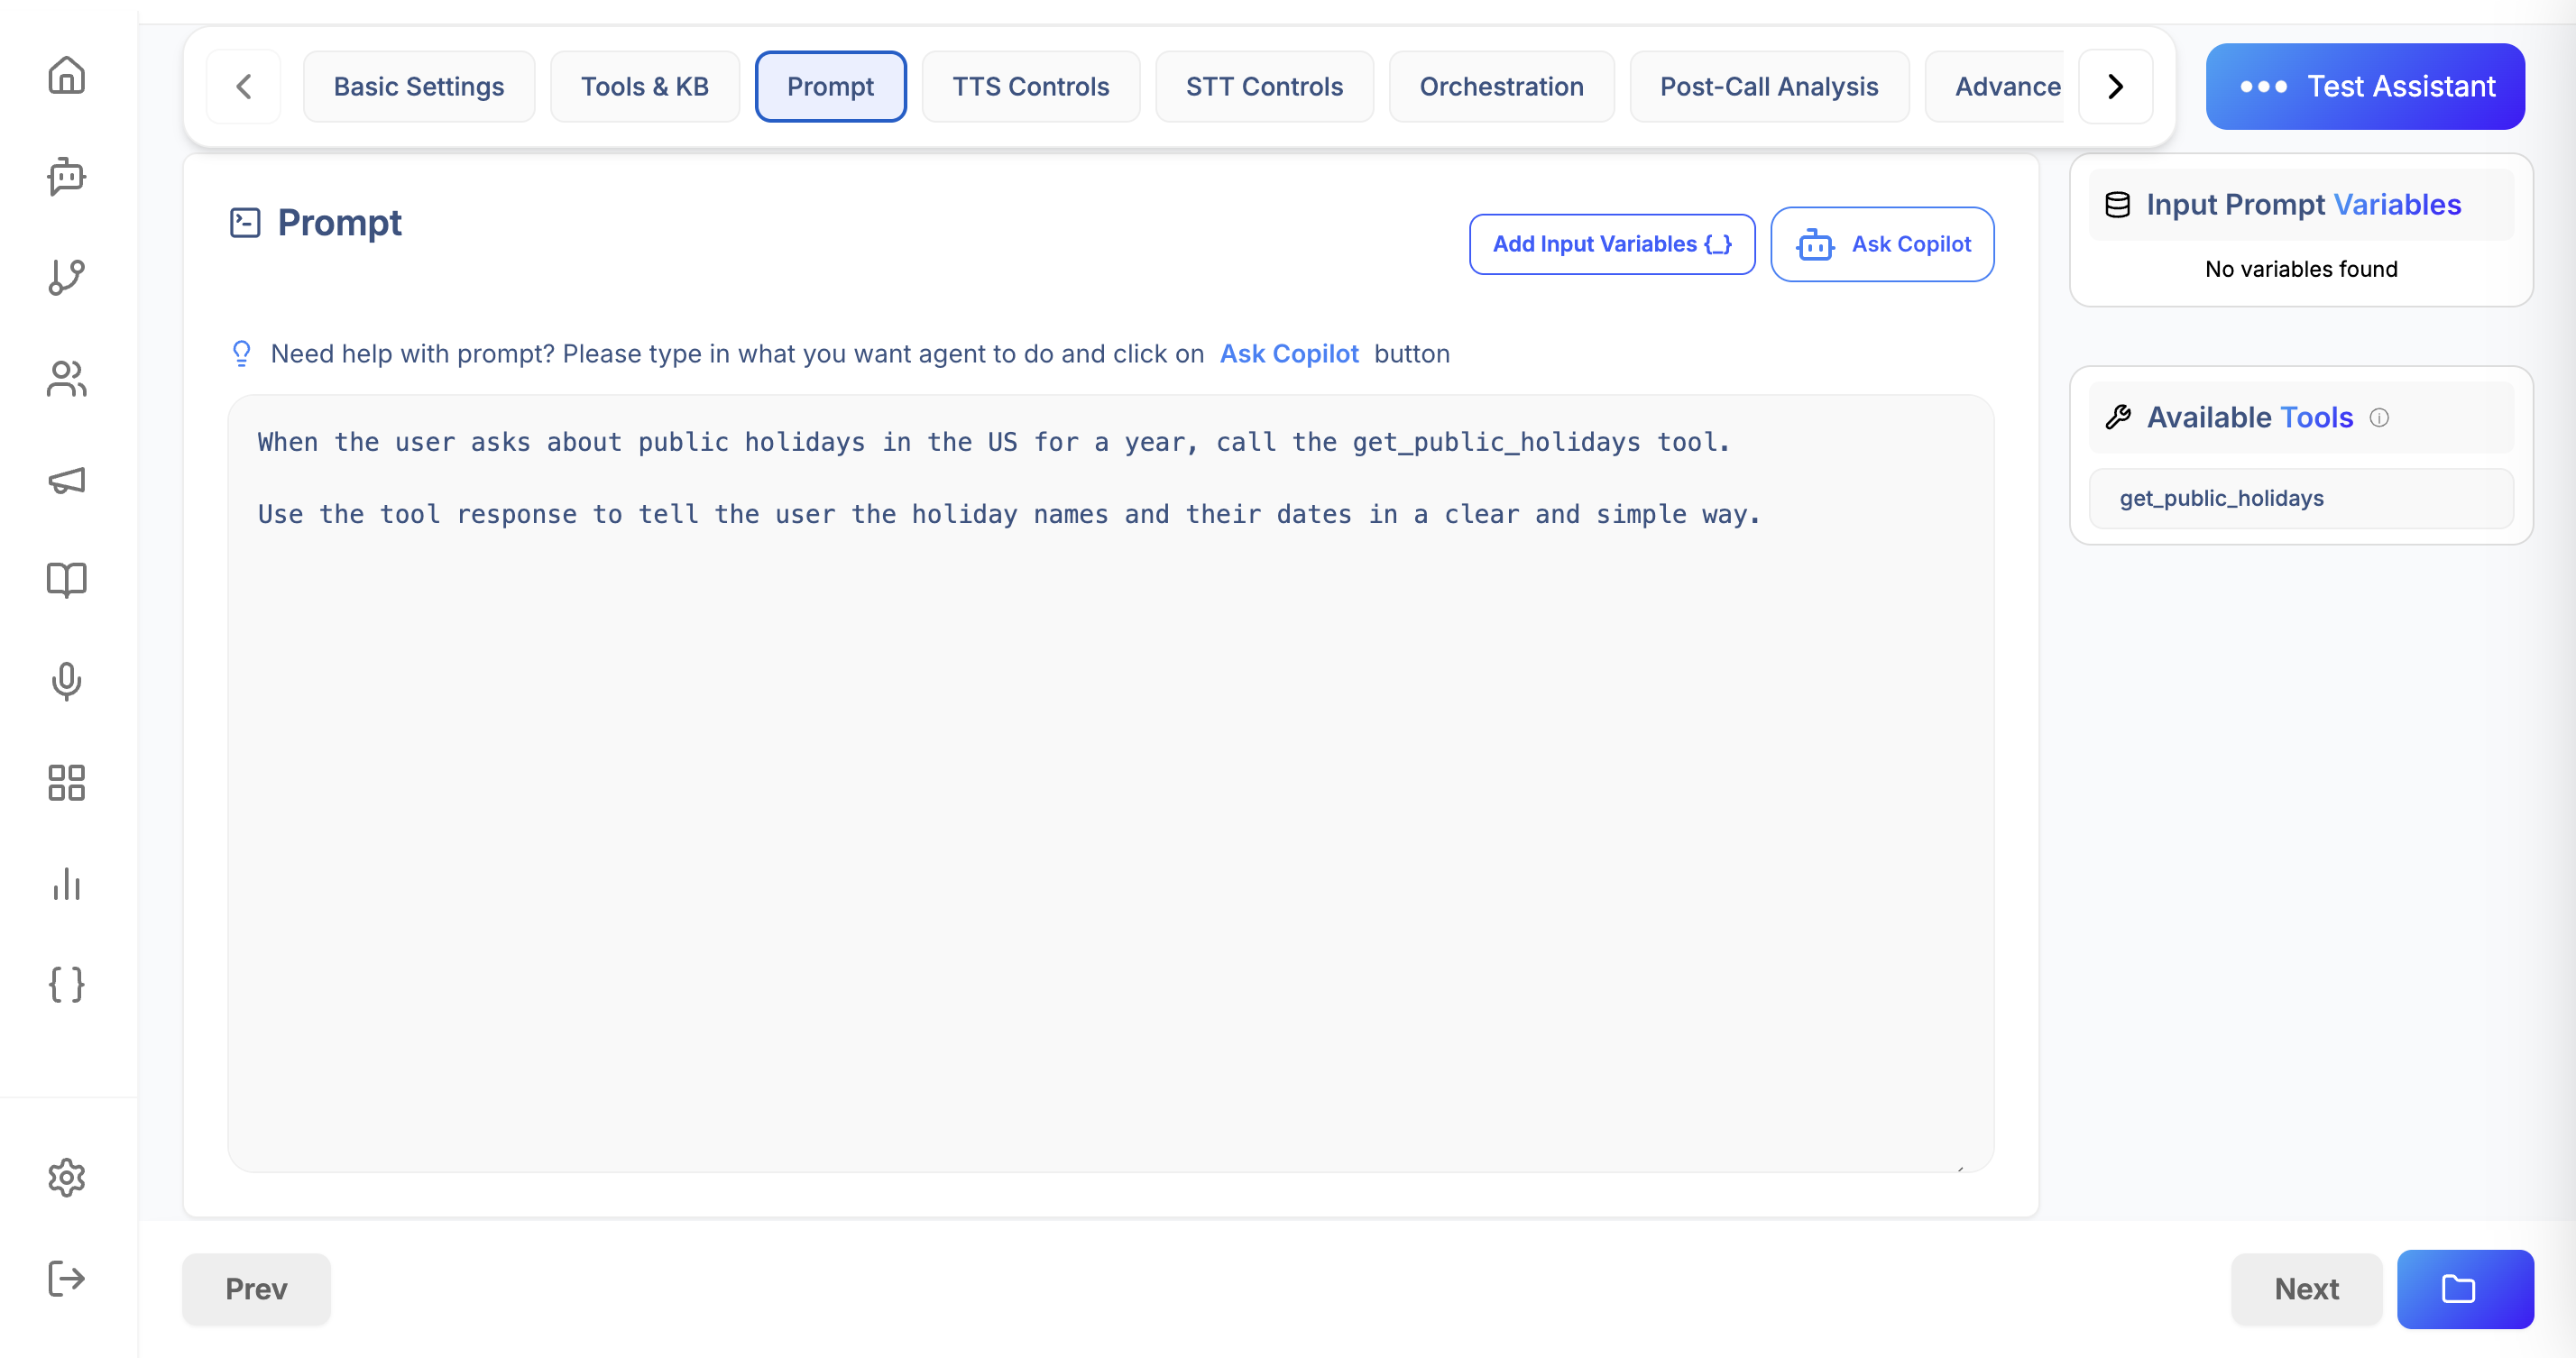
- Configure the assistant prompt.
- Choose voice and basic conversation settings.
- Add a Knowledge Base if answers should come from documents.
- Add tools if the assistant needs to perform actions.
- Create or select a pathway.
- Add contacts if you are running an outbound campaign.
- Run a test call before a full campaign.
- Open Analytics after calls complete.
- Review call status, duration, transcripts, and outcomes.
5. Assistant
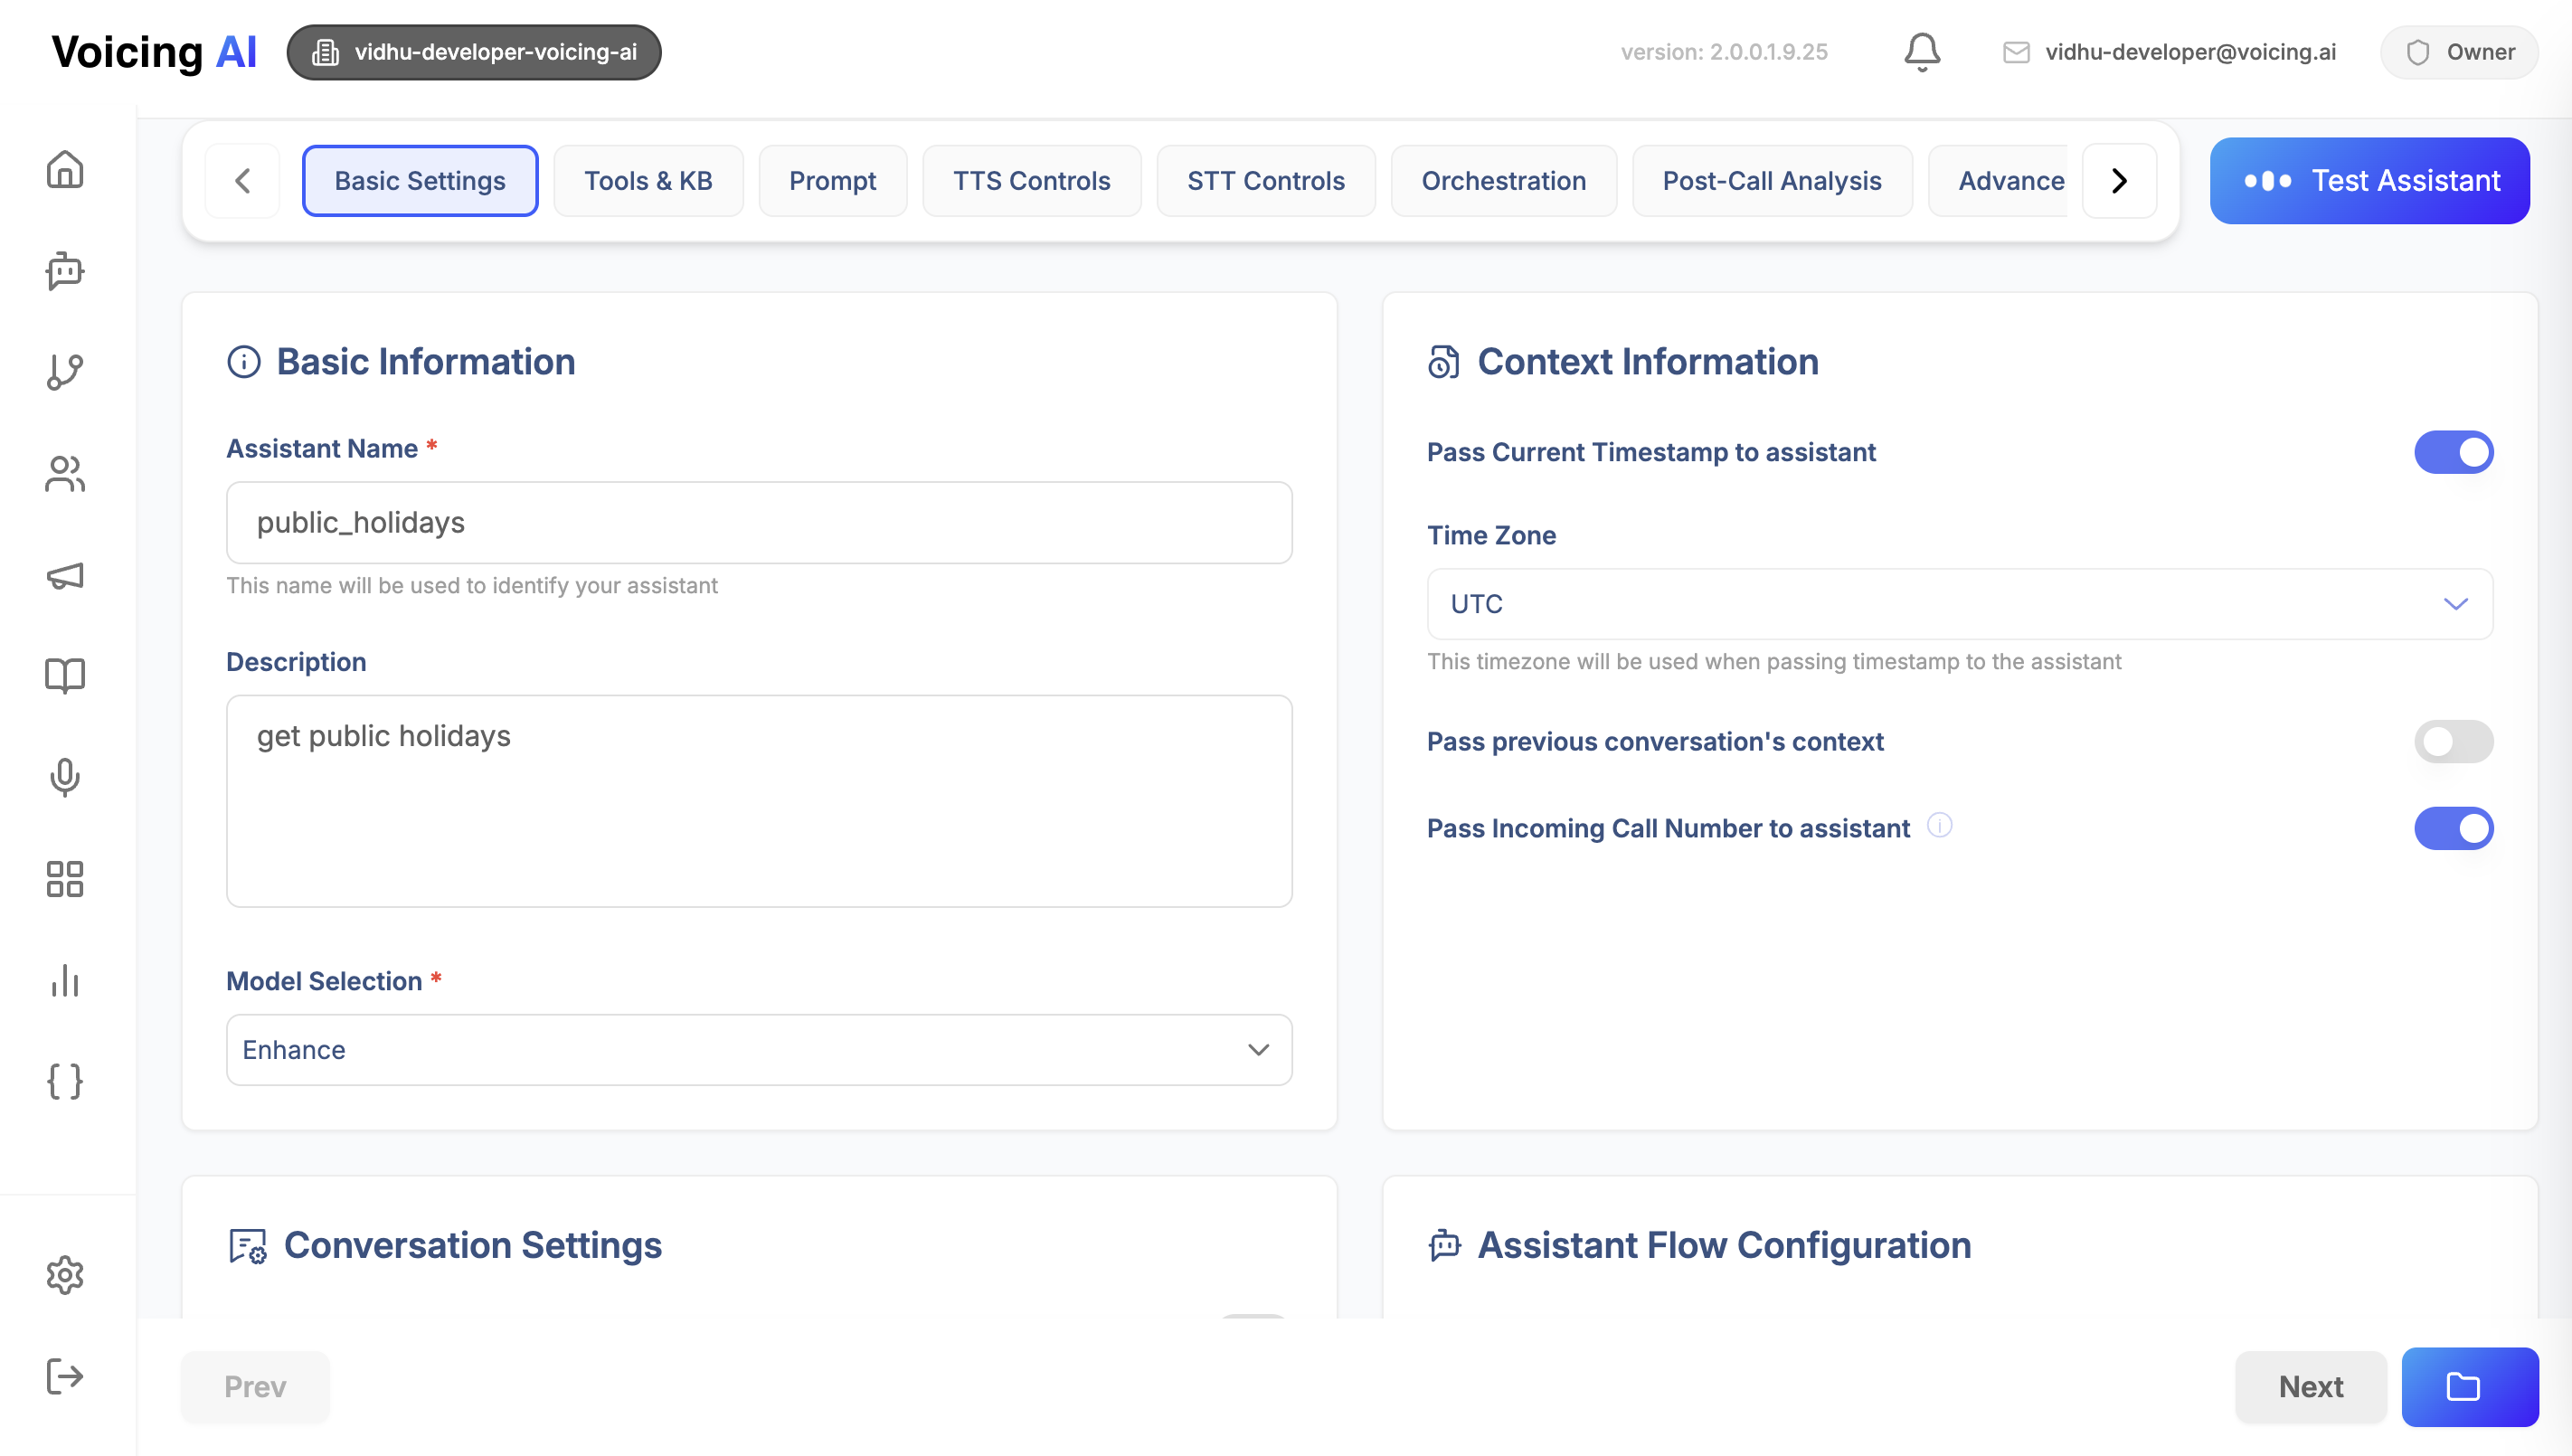
An assistant is the voice AI agent that speaks with callers. It uses the prompt, settings, tools, Knowledge Base, and pathway you configure.
Open Assistants from the platform navigation, then either create a new assistant or select an existing one.
Before using an assistant, check:
| Item | What to confirm |
|---|---|
| Name | The assistant name clearly describes the use case. |
| Prompt | The assistant instructions are simple and specific. |
| Voice/settings | The assistant has the correct voice and conversation settings. |
| Knowledge Base | The correct Knowledge Base is linked, if required. |
| Tools | Required tools are connected and tested. |
| Pathway | The assistant is connected to the correct call flow. |
Example:
| Field | Example |
|---|---|
| Assistant Name | Customer Support Assistant |
| Purpose | Answer customer queries and route calls based on user intent. |
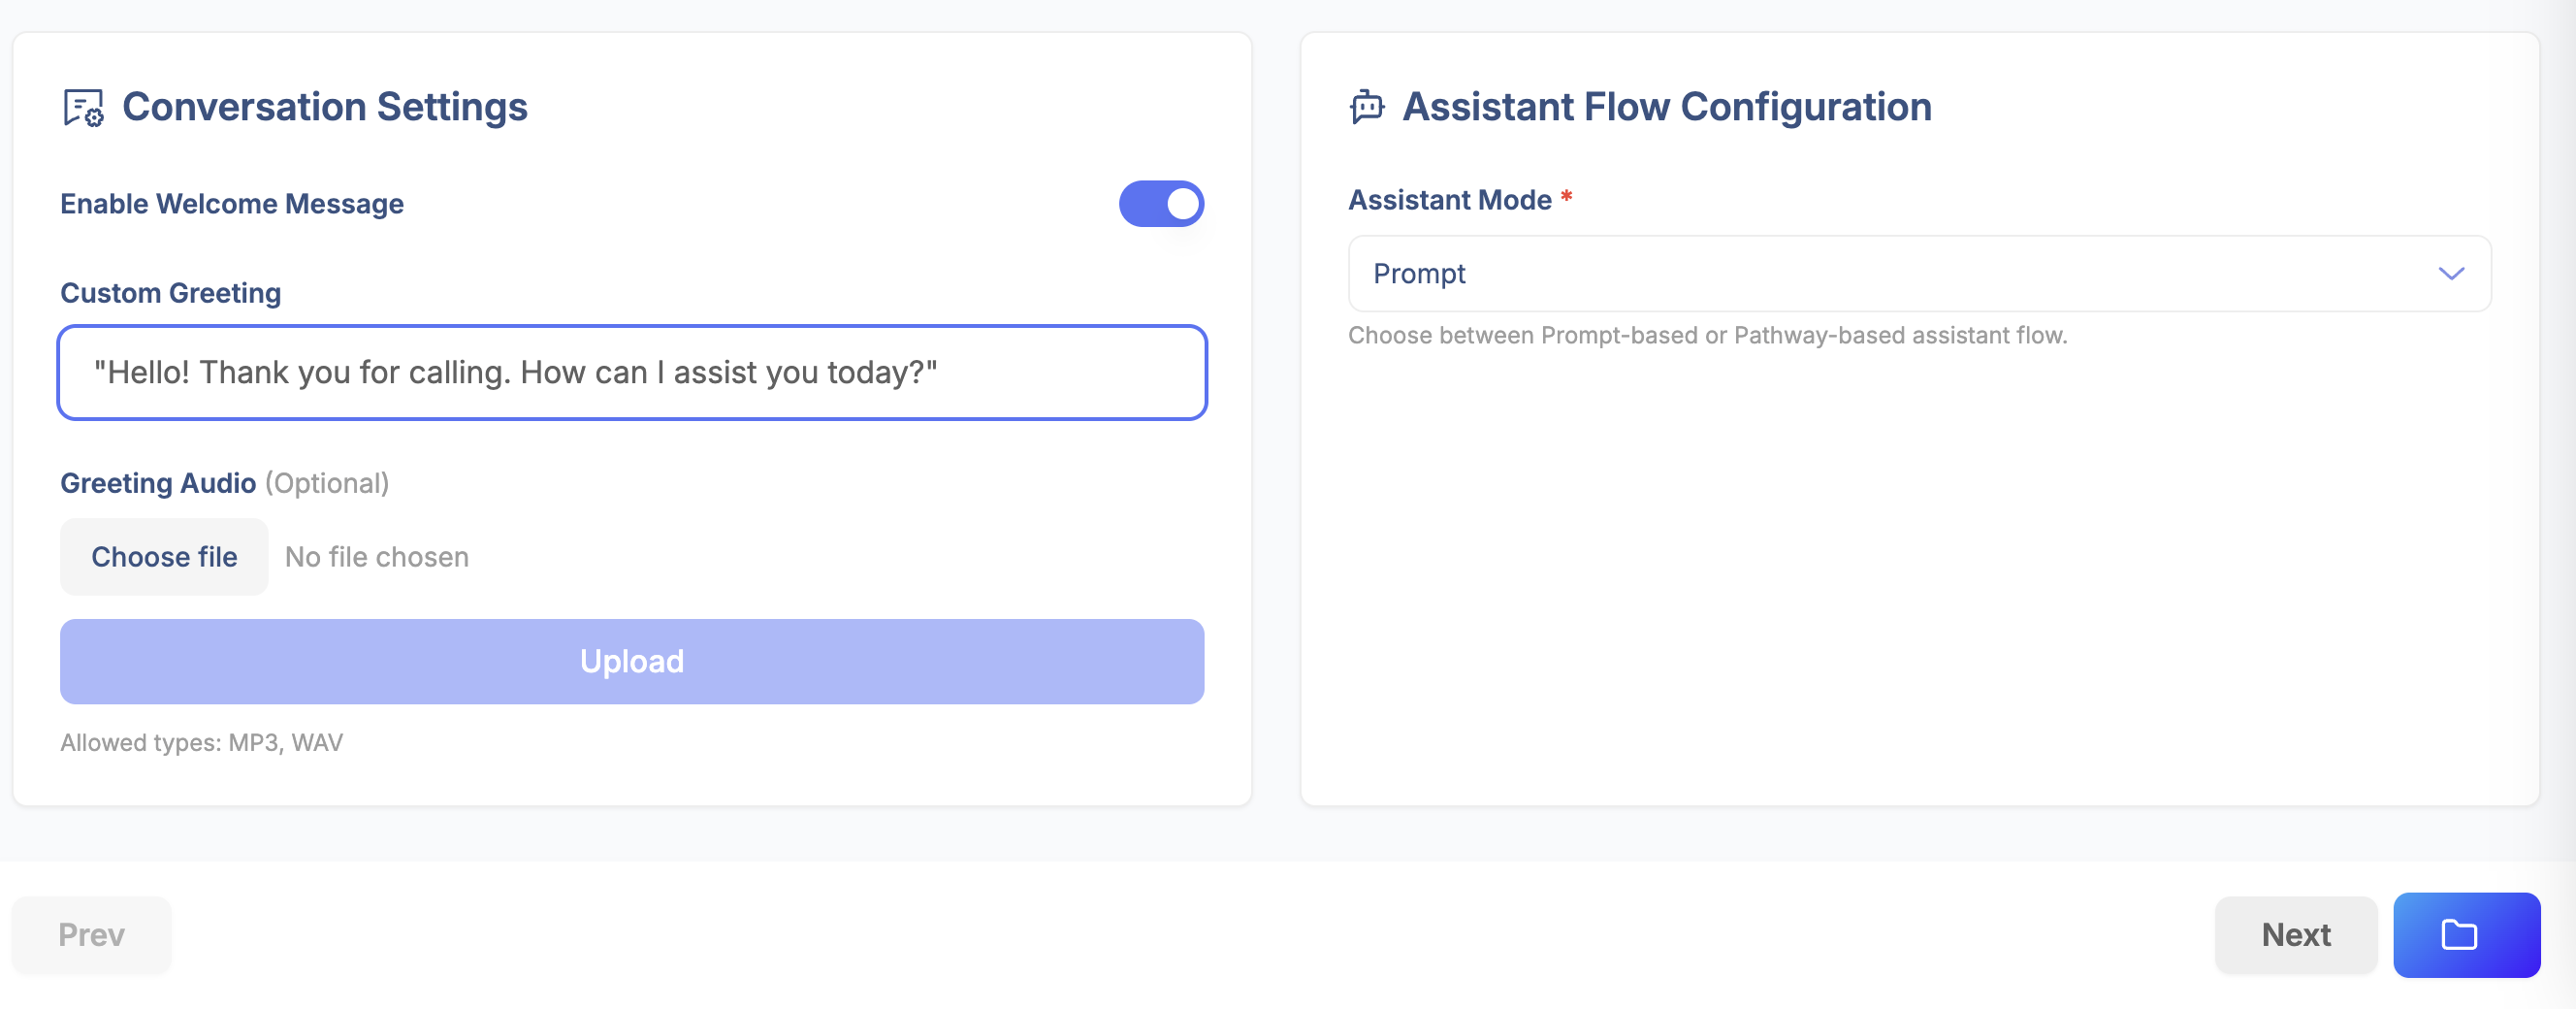
Assistant Settings
Prompt Configuration
Conversation Settings
6. Pathways
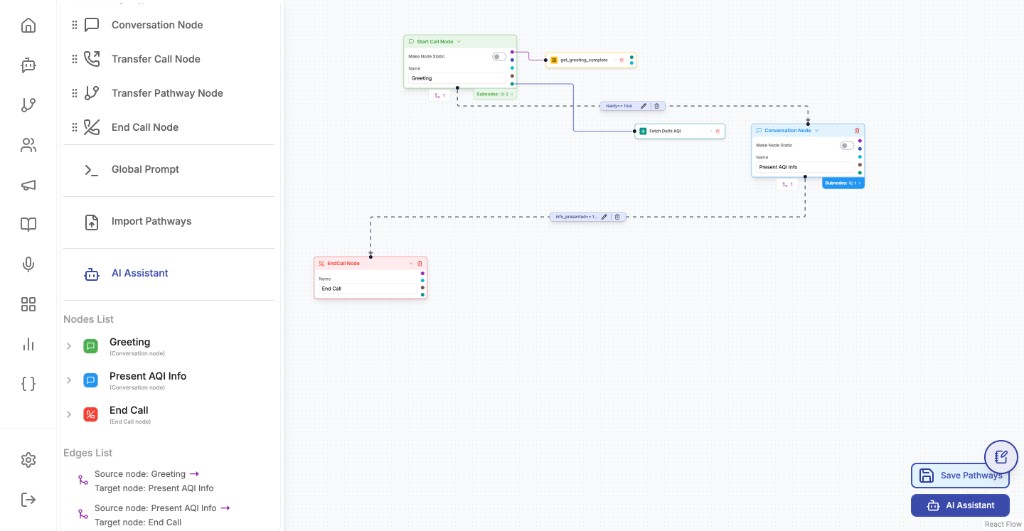
A pathway is the call flow the assistant follows. It helps decide what happens next during the conversation.
Use pathways when you want the assistant to:
- Ask the caller a question.
- Understand the caller's intent.
- Use a Knowledge Base answer.
- Run a tool or action.
- Transfer the call.
- End the call cleanly.
Basic pathway example:
Start Call -> Ask User Intent -> Extract Intent -> Action/Knowledge Base -> End Call/Transfer
Pathway Builder
7. Knowledge Base
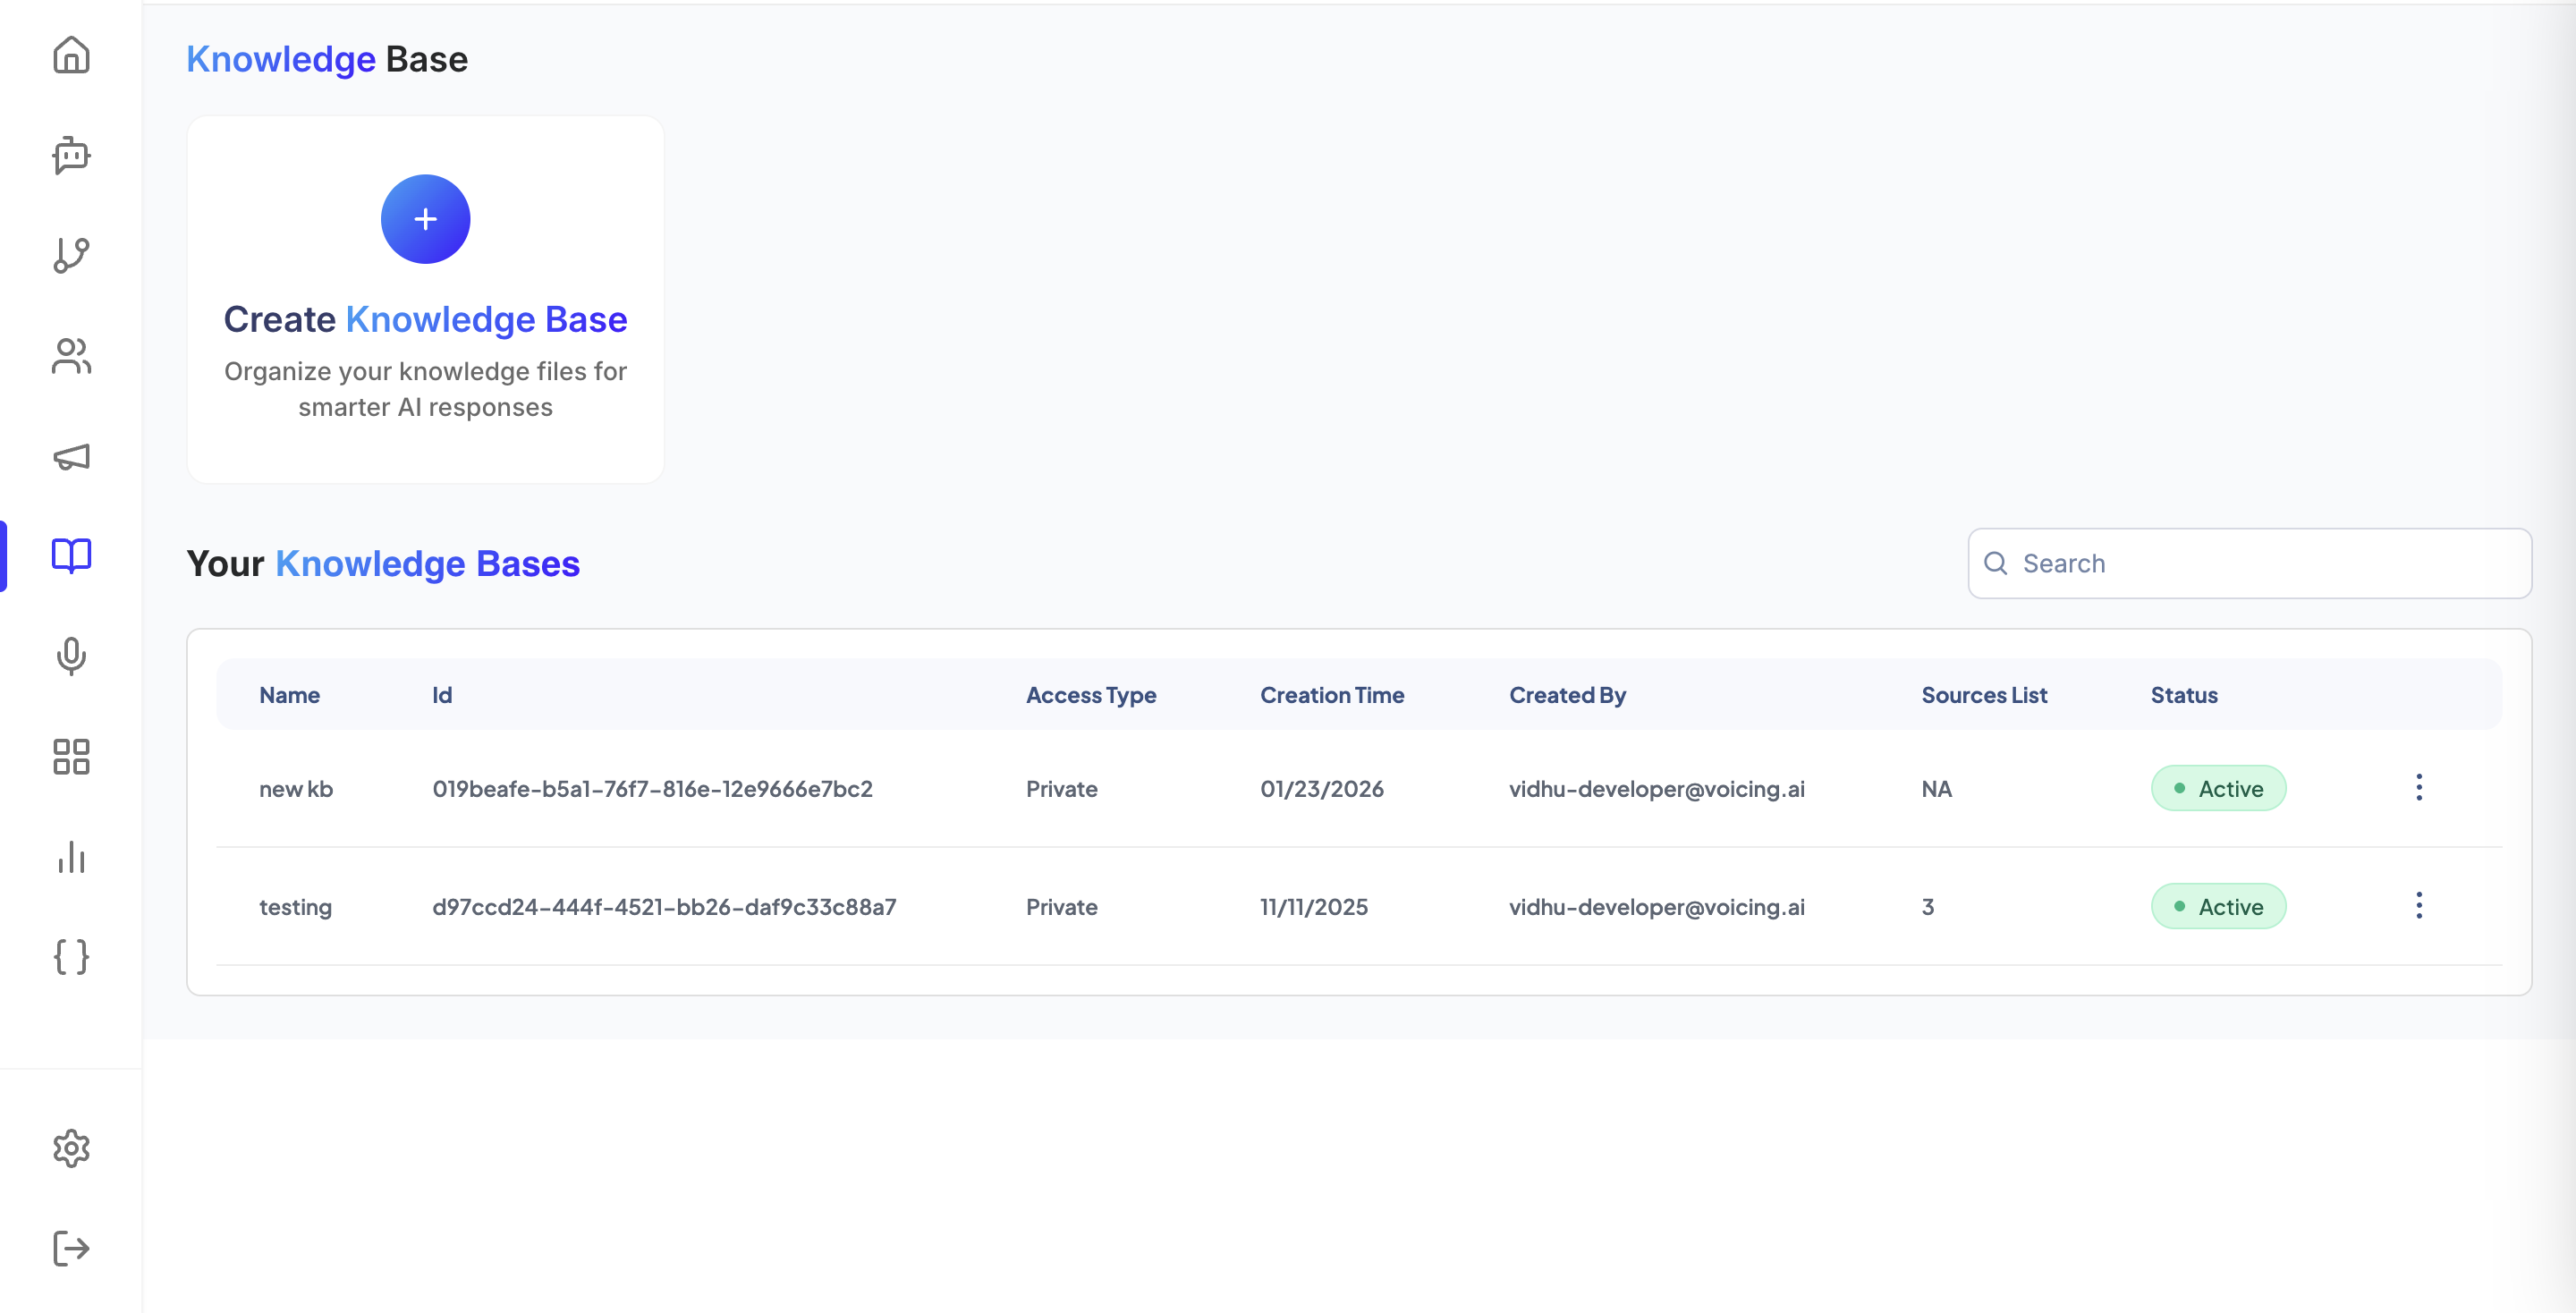
The Knowledge Base is where you upload helpful documents for the assistant. These can include FAQs, help articles, policy documents, product details, or support instructions.
Upload documents when:
- The assistant must answer company-specific questions.
- The same answers should be reused across many calls.
- Support teams want consistent responses.
After uploading, check:
| Check | Meaning |
|---|---|
| File uploaded | The document appears in the Knowledge Base. |
| Processing completed | The platform has finished reading the file. |
| Assistant linked | The assistant is connected to the right Knowledge Base. |
| Test question works | The assistant can answer from the uploaded content. |
Knowledge Base
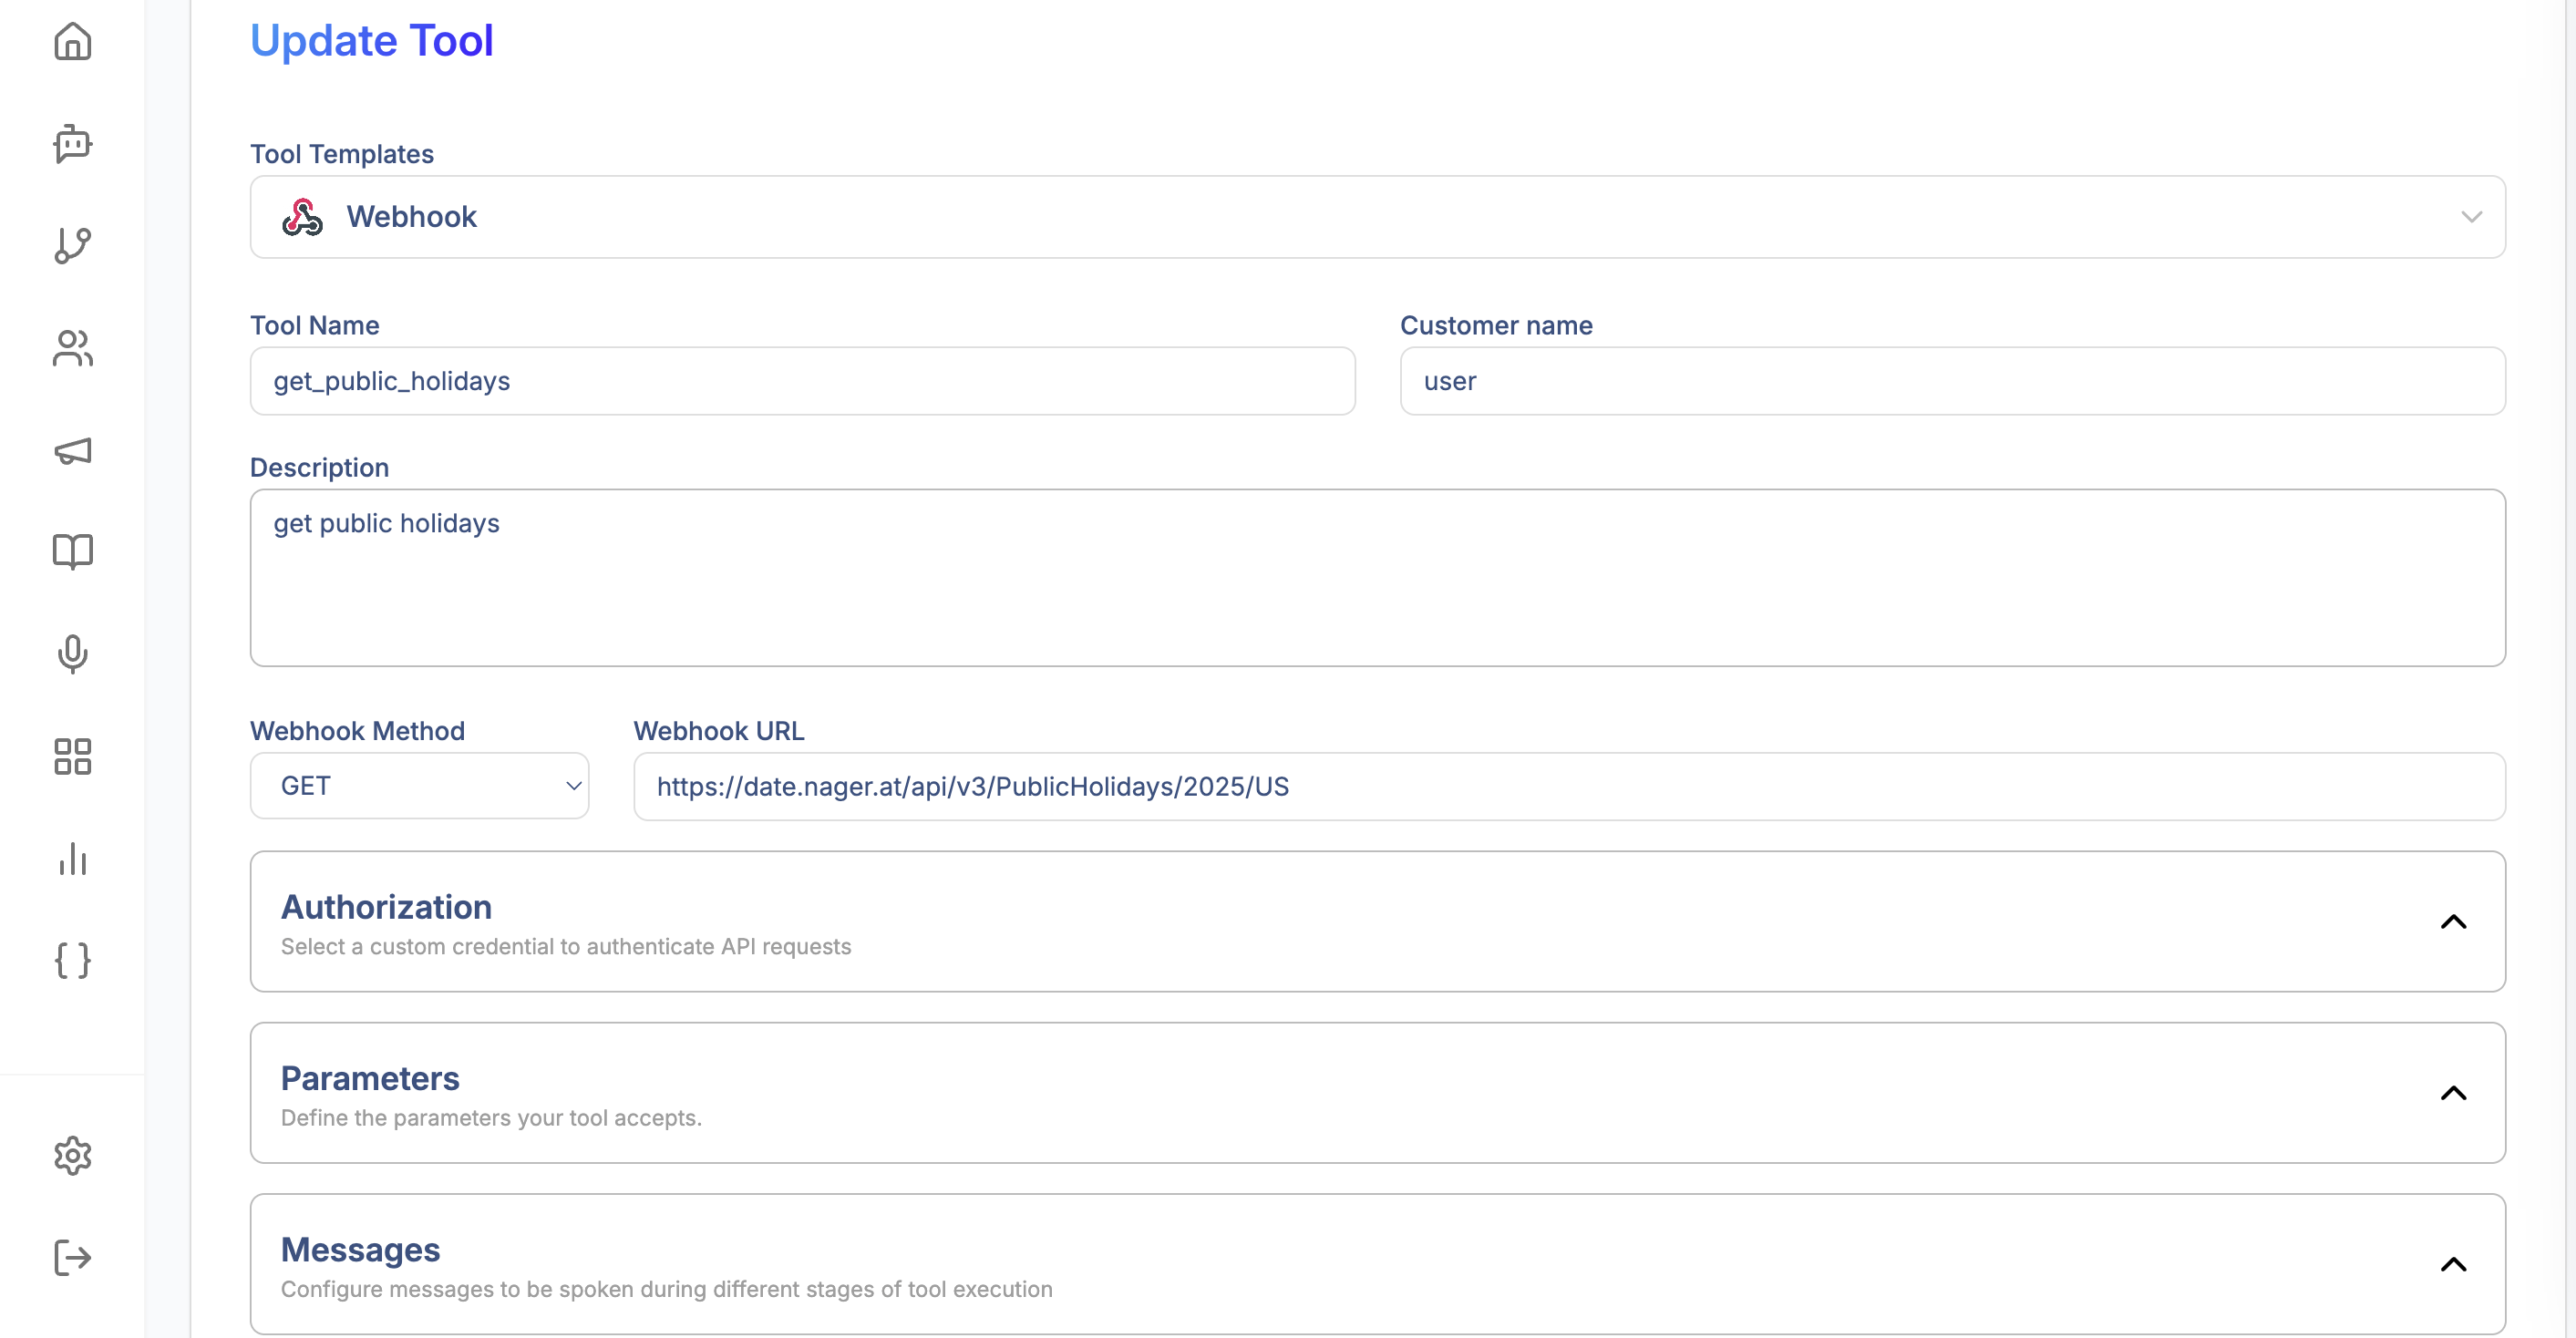
8. Tools
Tools allow the assistant to perform an action or fetch information during a conversation.
Examples of tools:
- Fetch ticket status.
- Create a support ticket.
- Get public holidays.
- Fetch customer data.
- Check appointment availability.
Tools can be used inside pathways or action nodes when a call step needs live information.
Before using a tool in a call, check:
| Check | Why it matters |
|---|---|
| Tool name is clear | Users can understand what the tool does. |
| Required fields are configured | The tool gets the information it needs. |
| Test run succeeds | The assistant can use the tool during calls. |
| Pathway node uses the tool | The tool is connected to the right call step. |
Tool Configuration
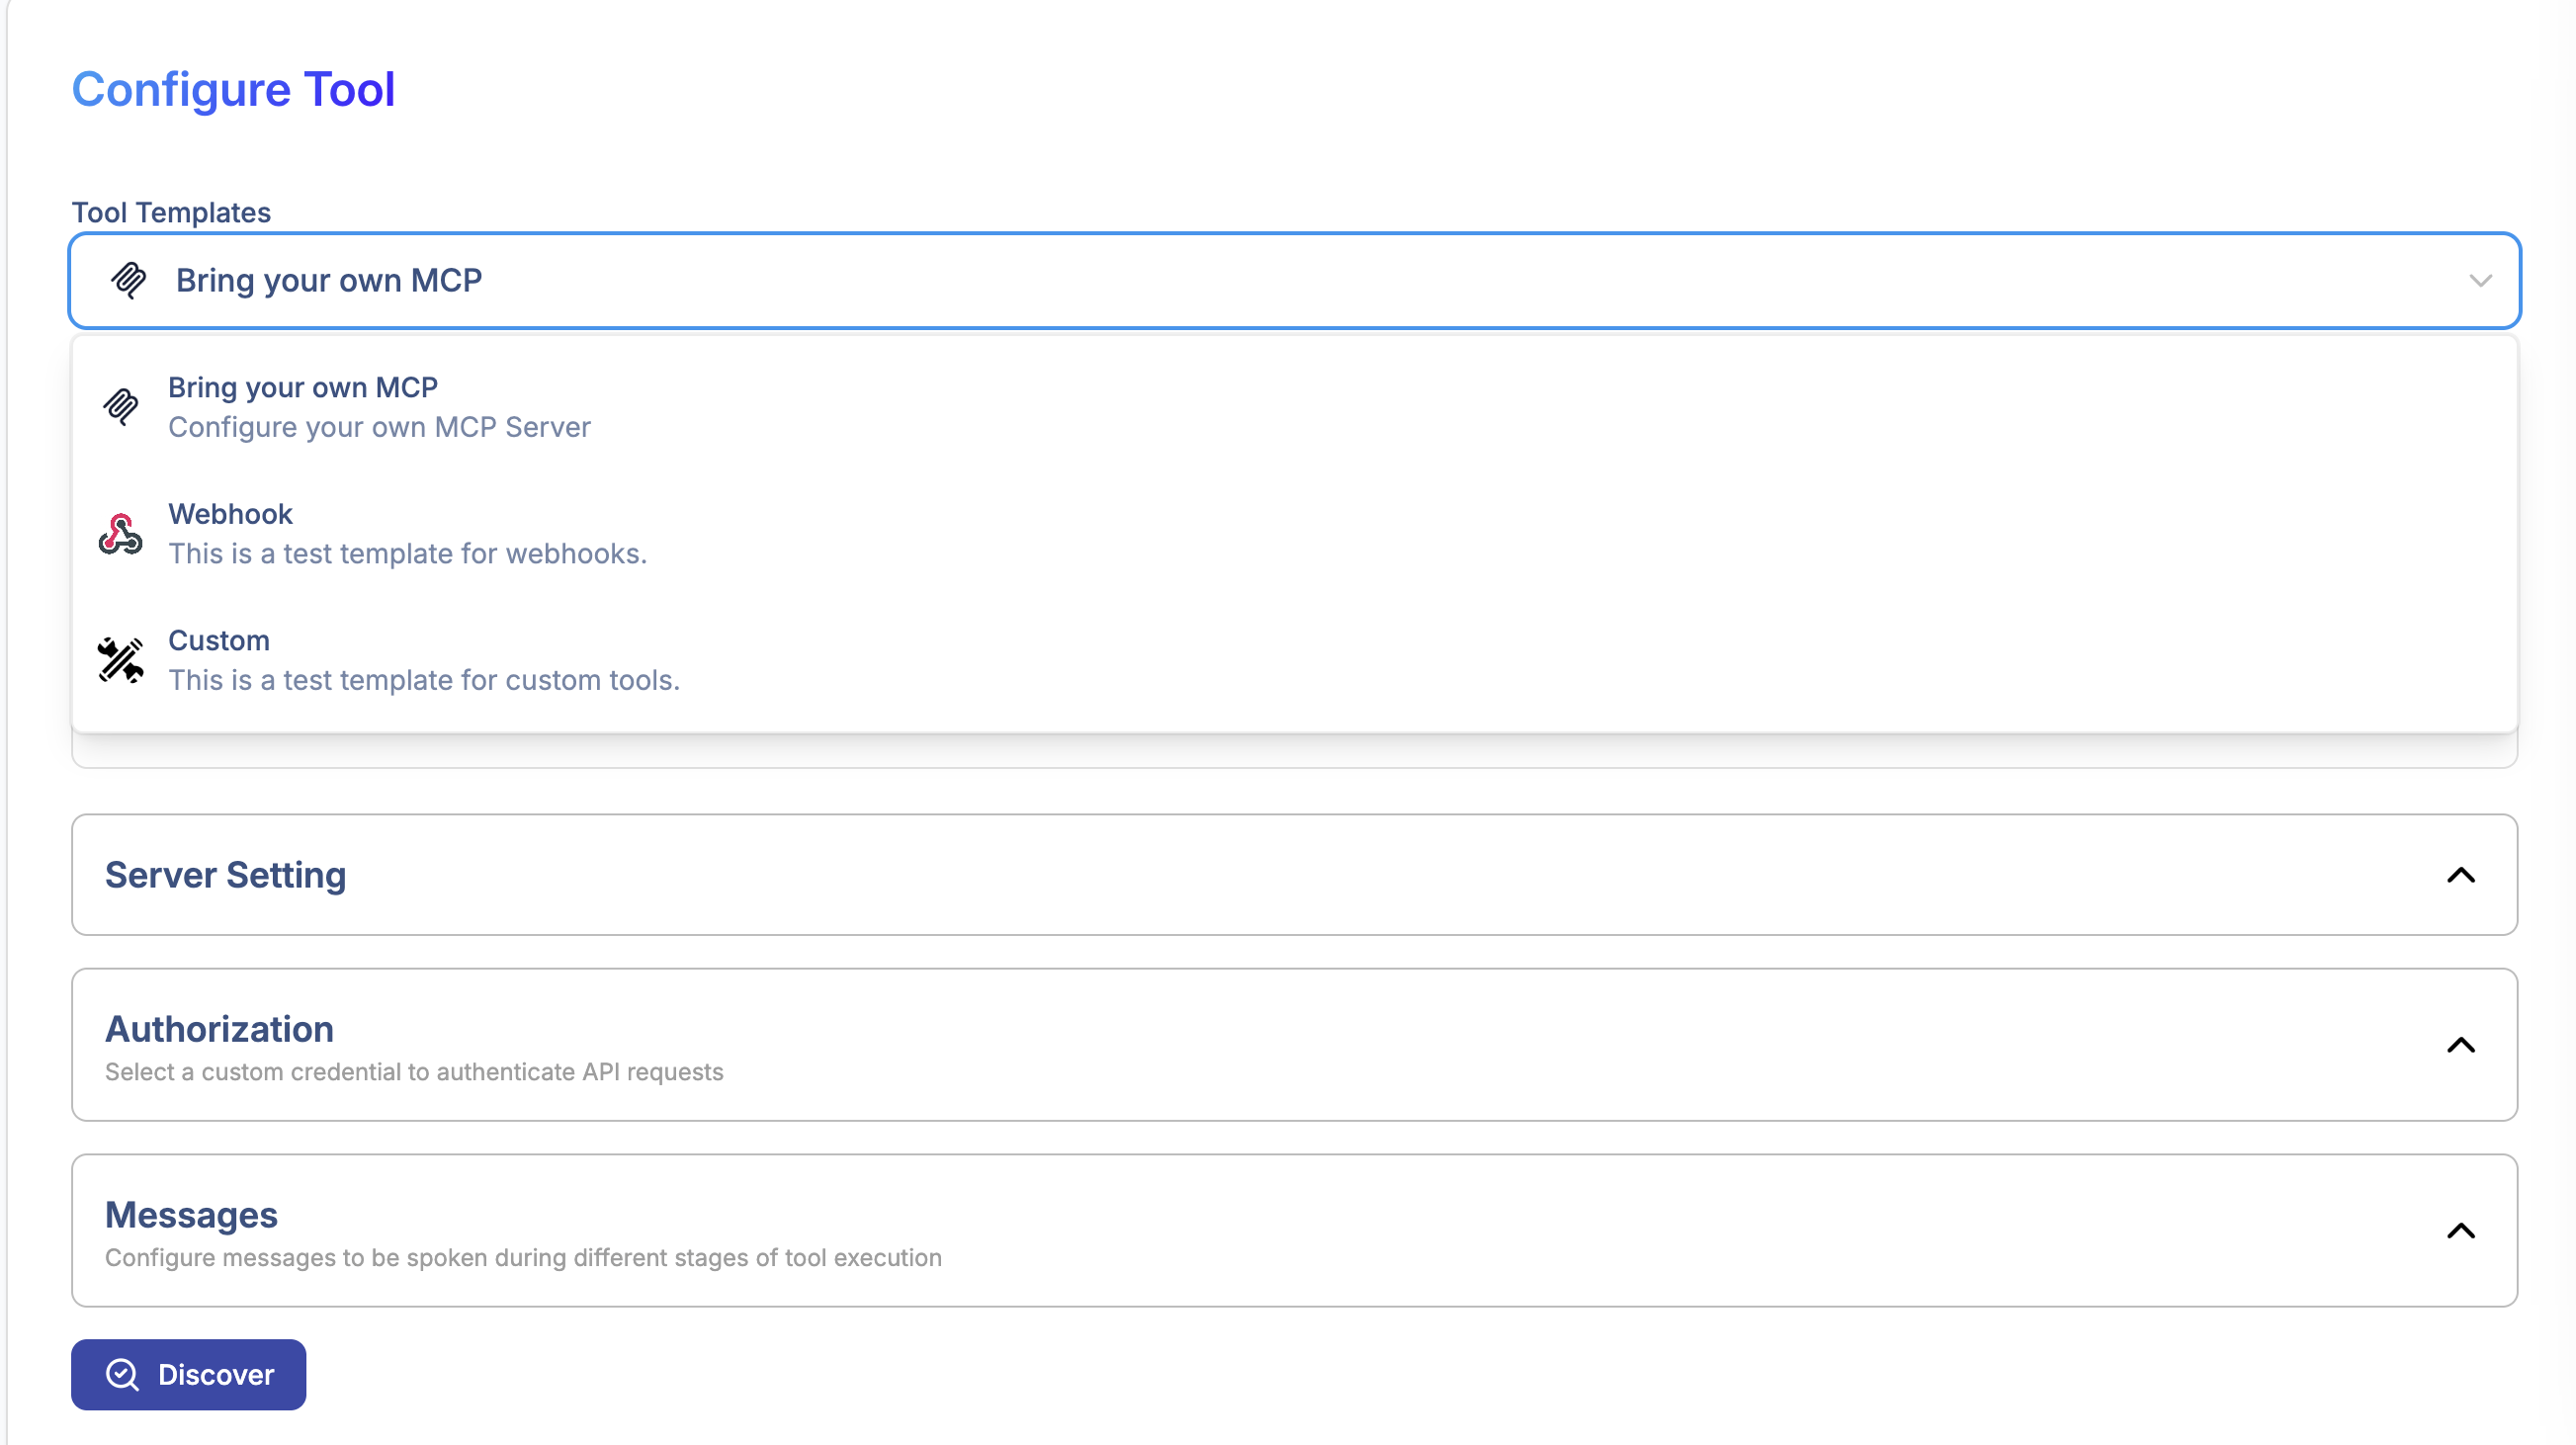
Example Tool
9. Campaigns
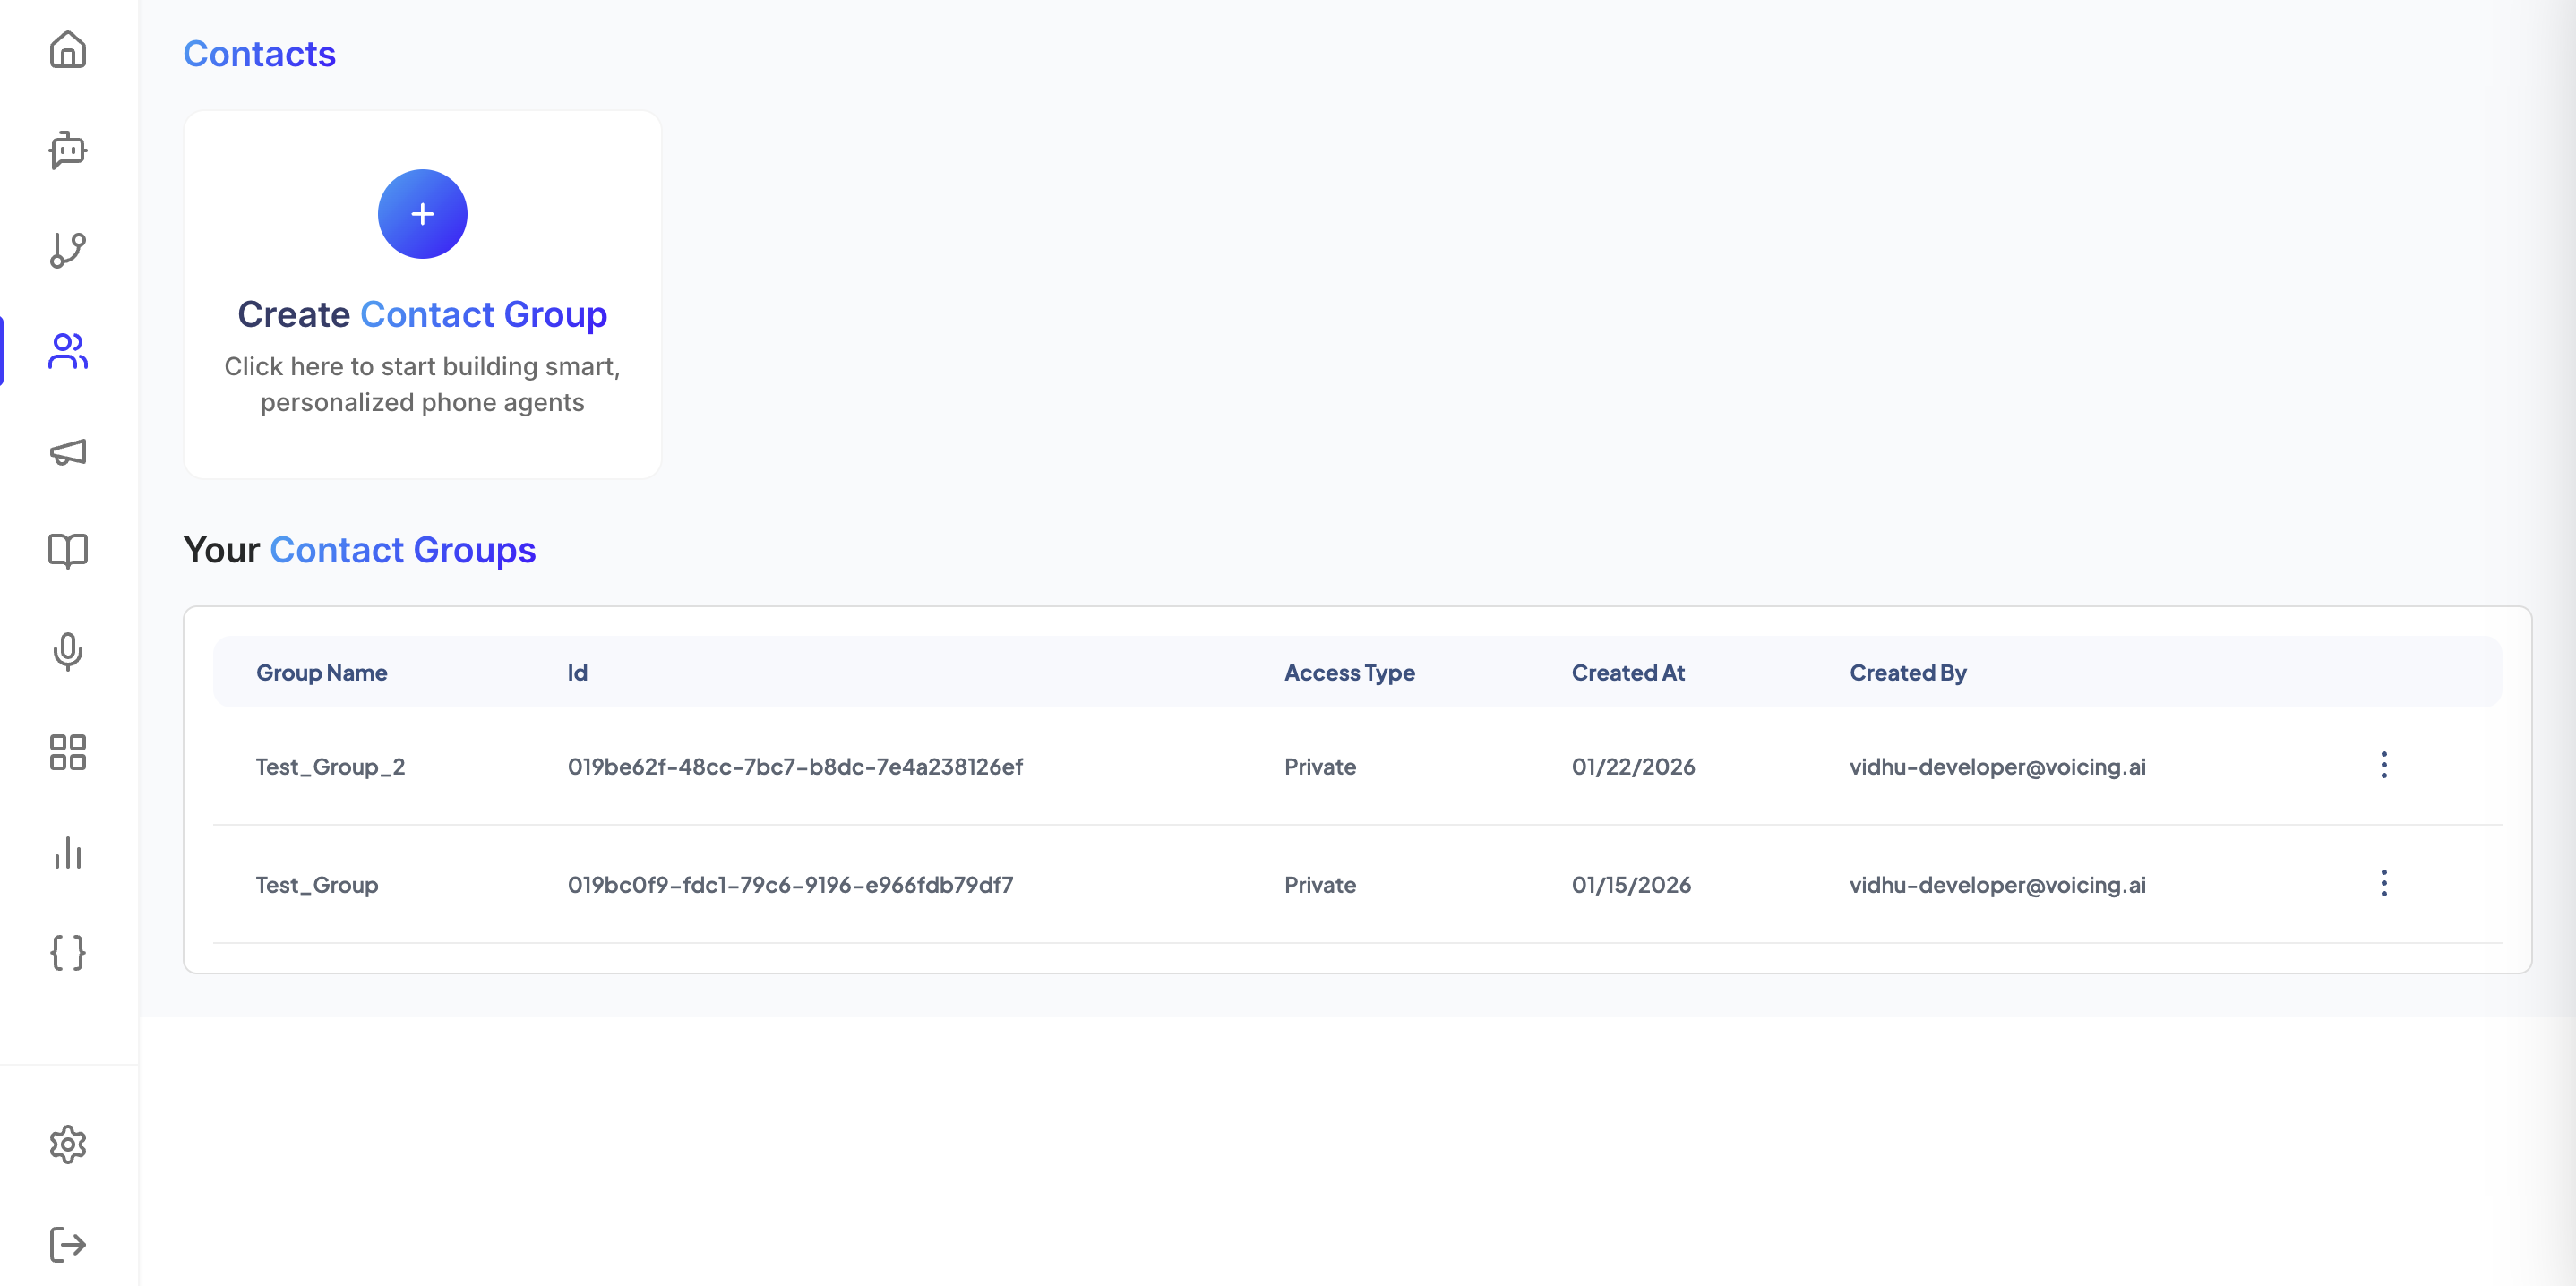
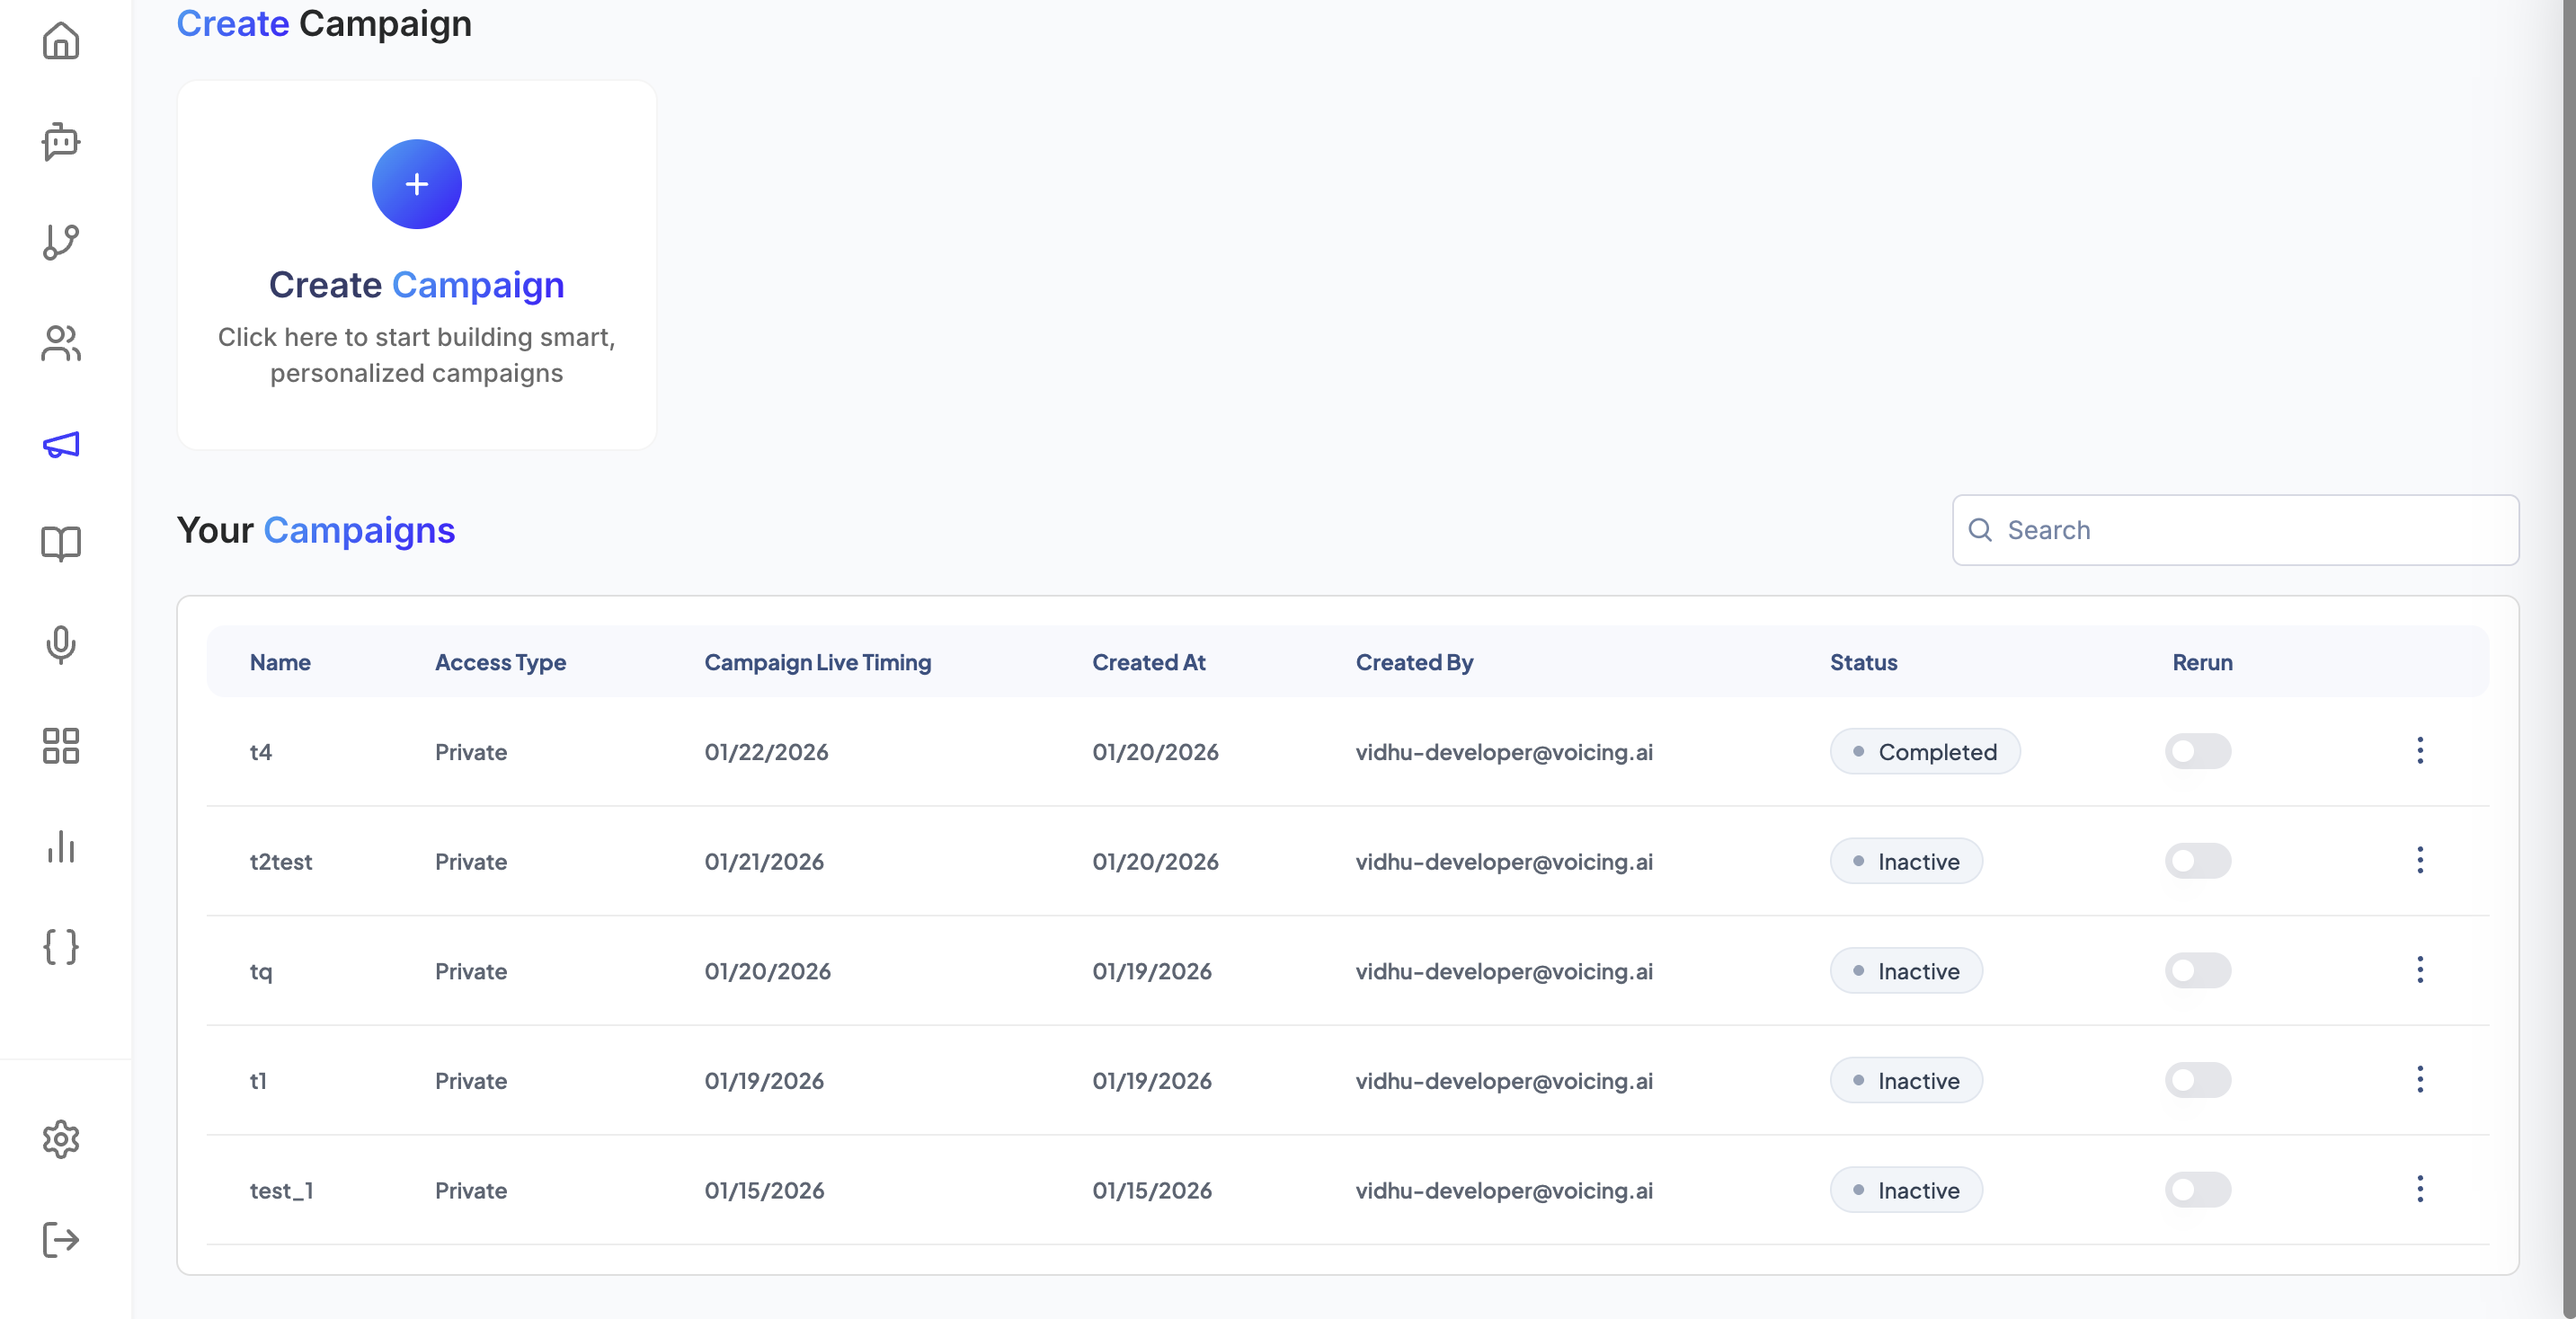
Campaigns are used to run outbound calls to a list of contacts.
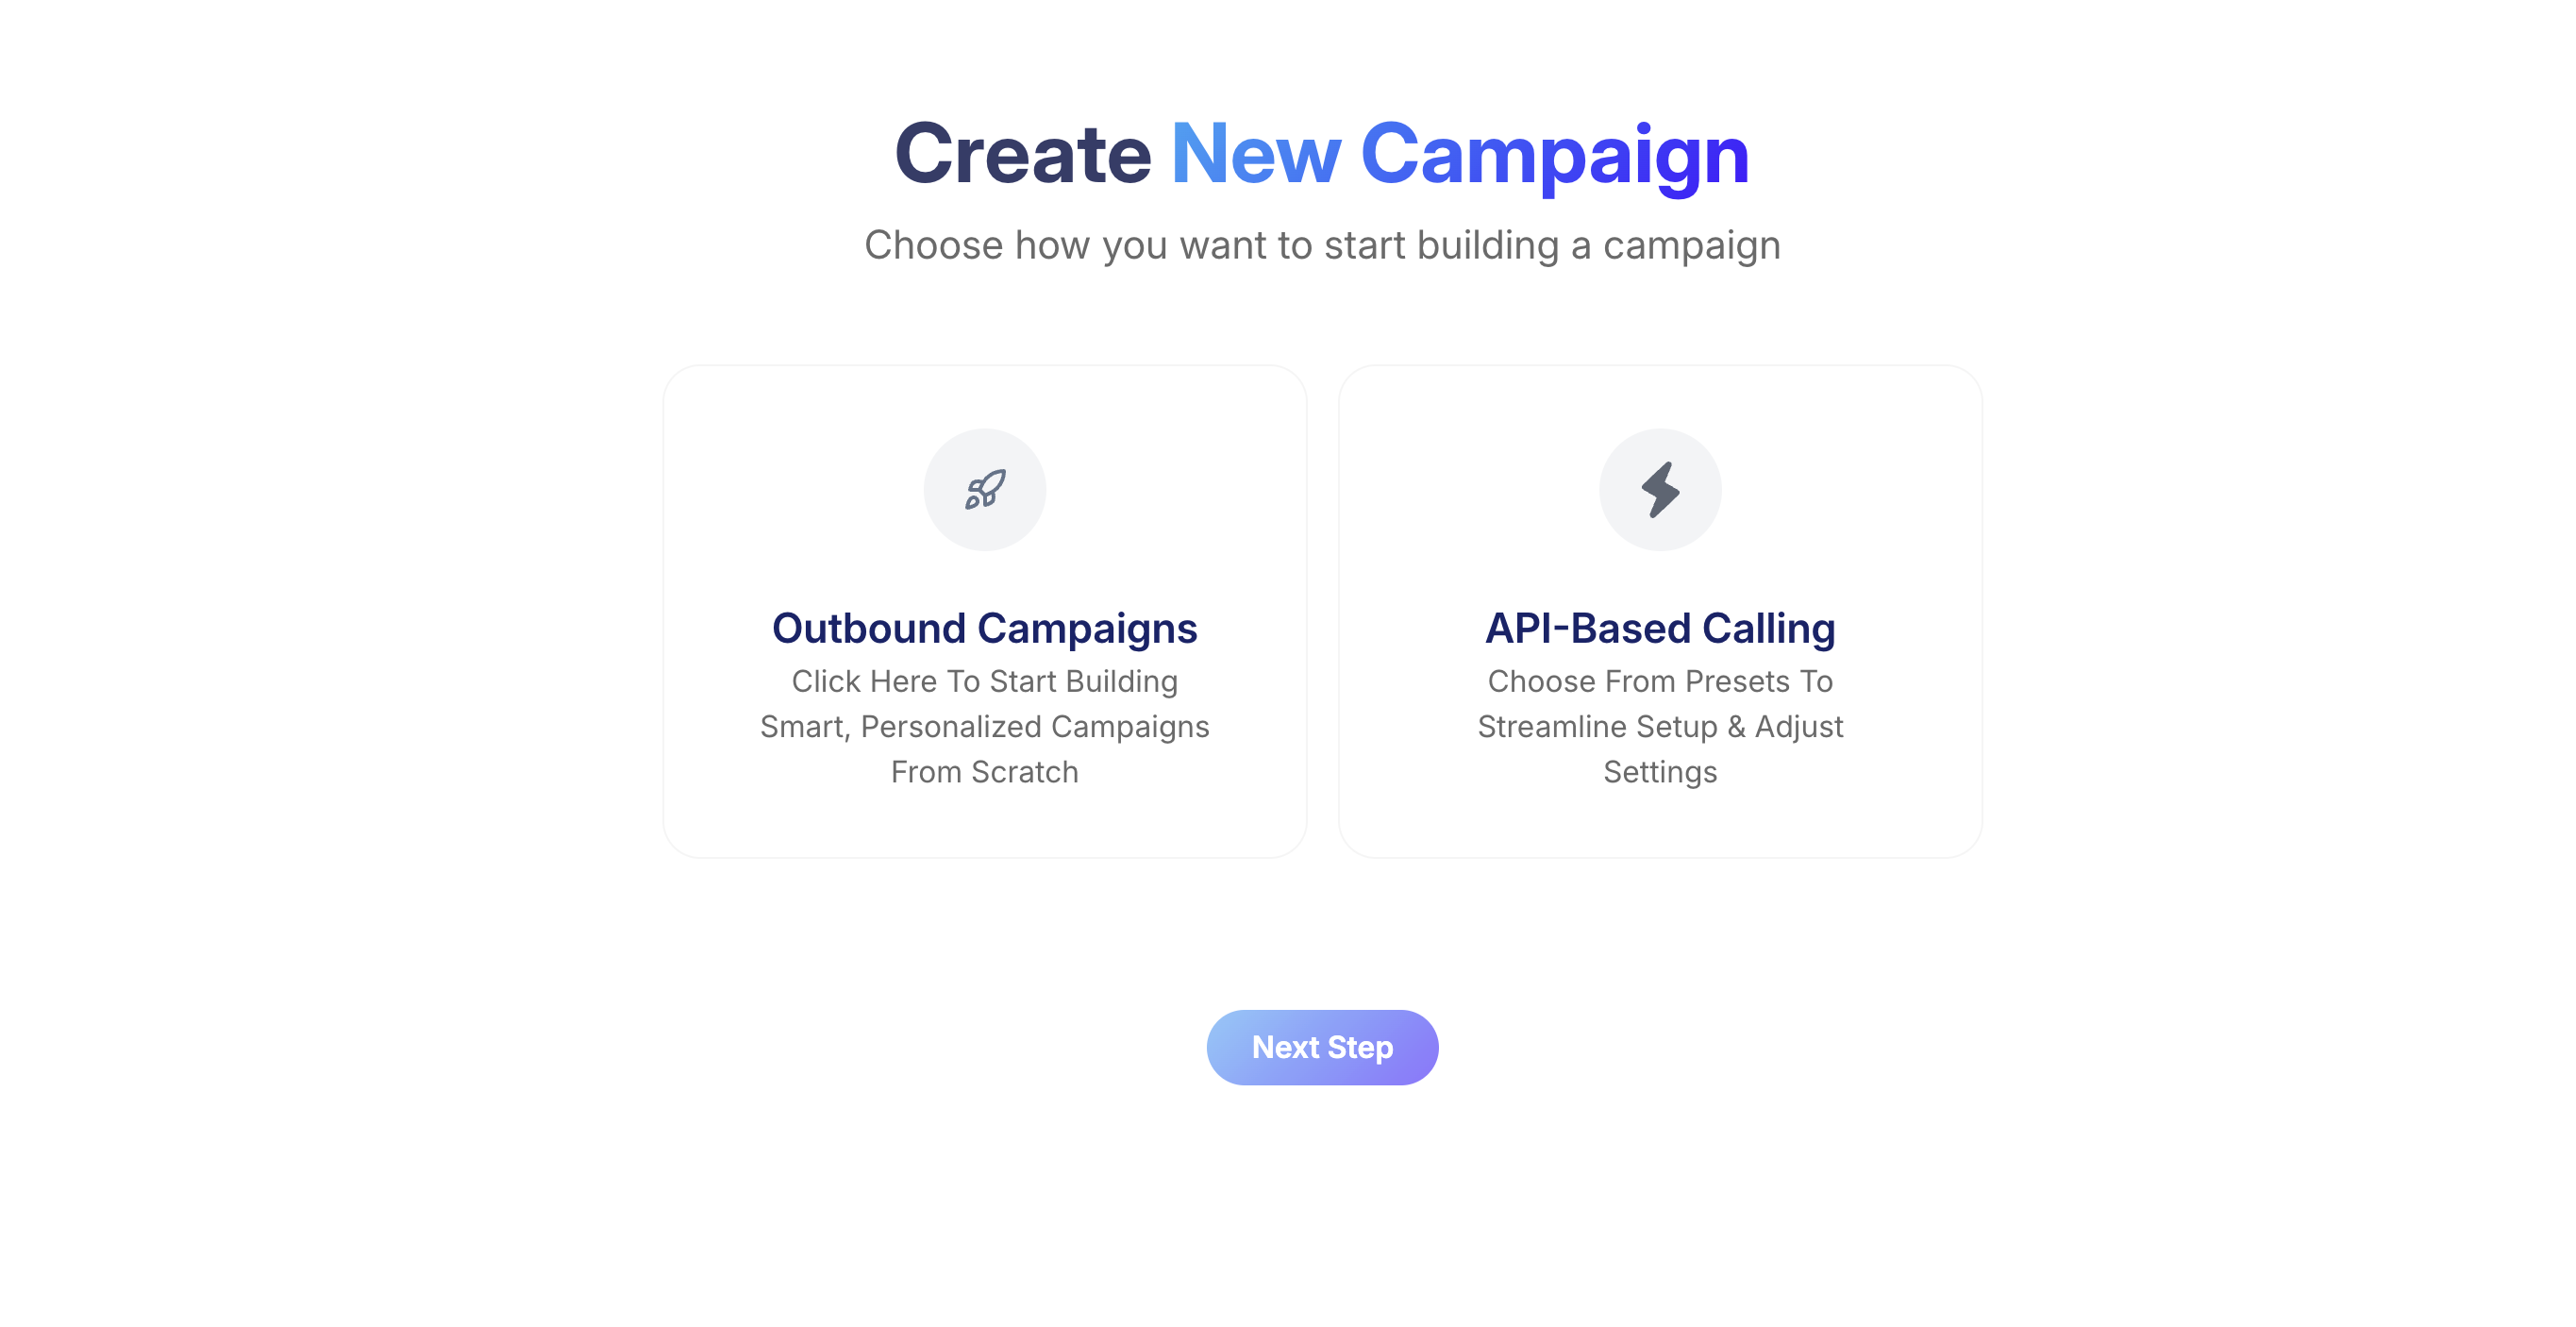
Basic campaign flow:
- Open Contacts and upload or select a contact list.
- Open Campaigns.
- Create a campaign.
- Select the assistant.
- Select the provider/settings required for calling.
- Review the contact list.
- Start with a small test campaign.
- Check Analytics after calls complete.
Make sure contacts are properly formatted before uploading. Phone numbers should include the expected country code and should not contain invalid characters.
Contacts
Campaign Creation
Campaign List
10. Analytics
Analytics is one of the most important areas for a newcomer. After every test call or campaign, open Analytics from the left navigation to understand what happened and what should be improved.
Where to open Analytics
- Log in to the Voicing AI platform.
- Confirm you are in the correct workspace (top of the screen).
- Click Analytics in the left sidebar.
- Use the tabs at the top to switch between views:
- Analytics — summary metrics and dashboard cards
- Call Logs — detailed table of every call with IDs, duration, and status
- Logs — quick list of historic or live calls with filters
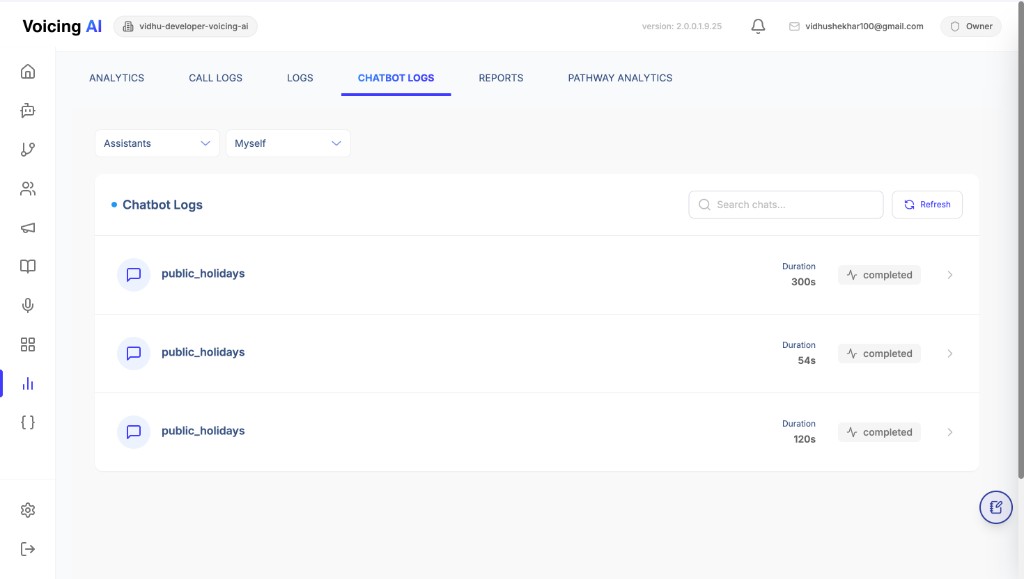
- Chatbot Logs — text chat sessions with assistants
- Reports — reporting views (if enabled for your workspace)
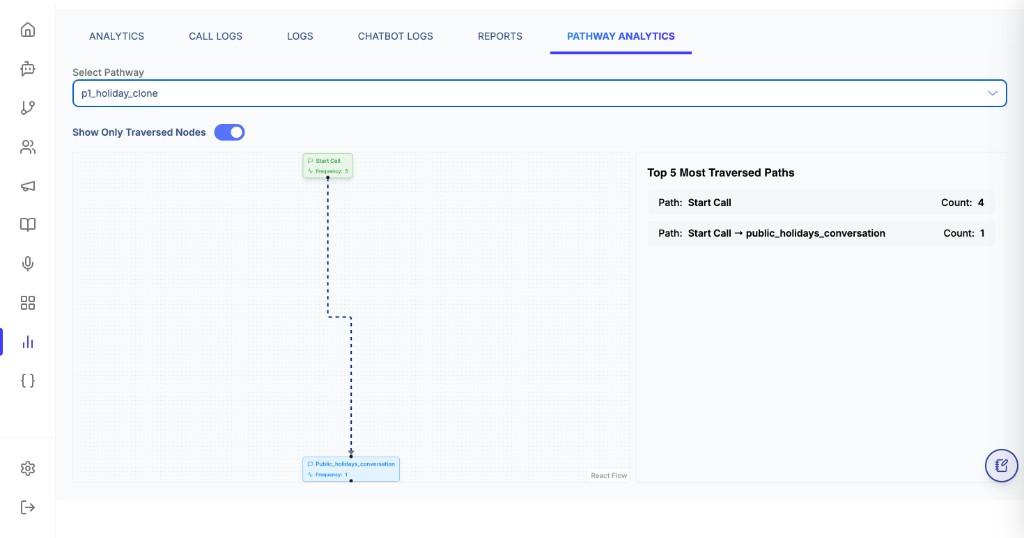
- Pathway Analytics — visual view of how callers move through a pathway
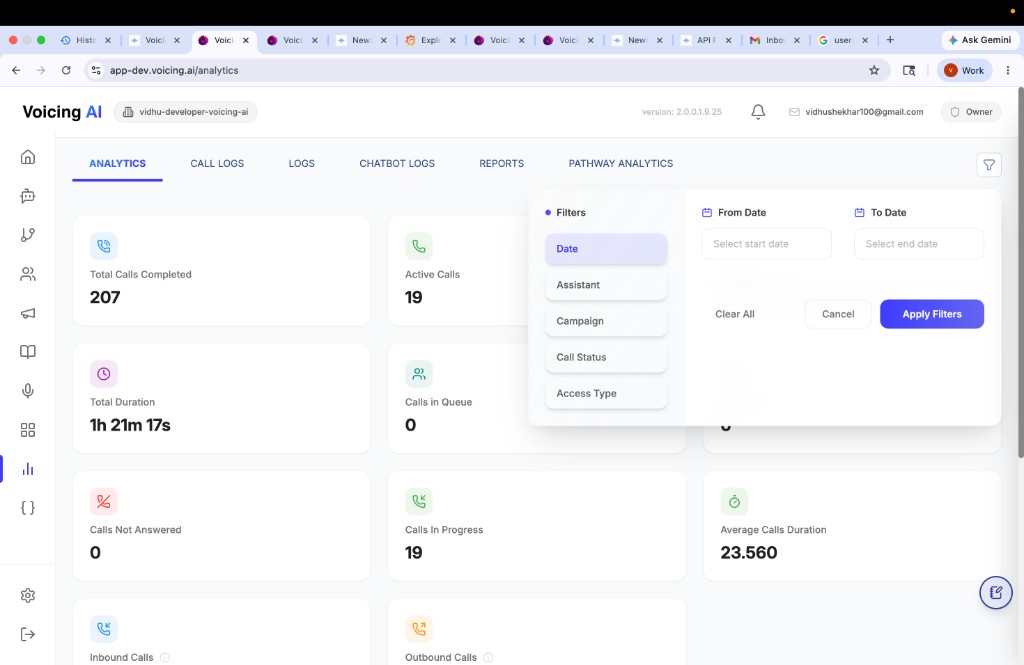
Analytics overview dashboard
The Analytics tab shows high-level call metrics in cards, such as:
- Total calls completed
- Total duration
- Calls not answered
- Active calls and calls in progress
- Average call duration
- Inbound and outbound call counts
Use the filter button to narrow results by Date, Assistant, Campaign, Call Status, or Access Type. This helps you review only the calls you care about (for example, one assistant or one test day).
Call Logs
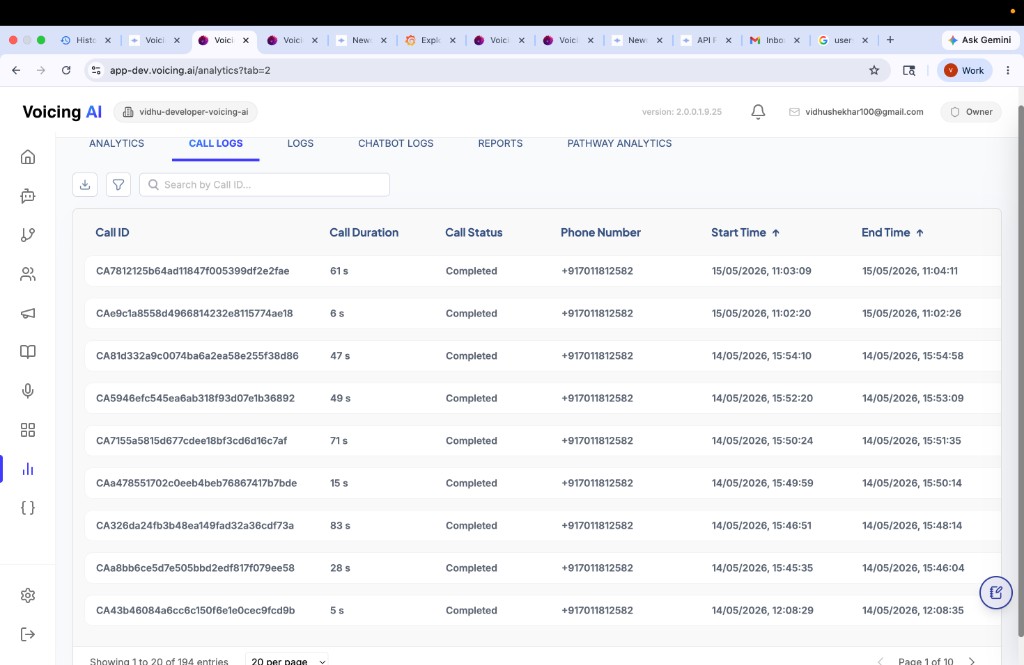
Open the Call Logs tab to see a row-by-row list of calls. Each row typically includes:
| Column | What it shows |
|---|---|
| Call ID | Unique ID for the call (use search to find a specific call). |
| Call duration | How long the call lasted. |
| Call status | Whether the call completed, failed, or had another outcome. |
| Phone number | Number used for the call. |
| Start time / End time | When the call began and ended. |
From this screen you can search by Call ID, apply filters, and download logs for reporting.
Reviewing recordings, transcripts, and outcomes
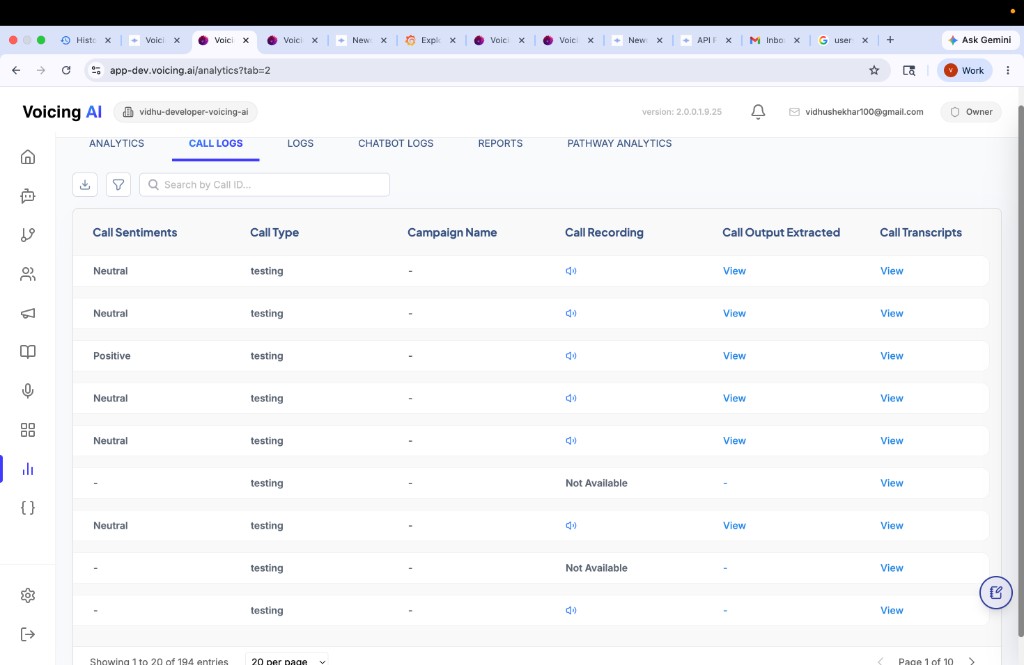
In Call Logs, scroll or open additional columns to review quality details:
| Column | What it shows |
|---|---|
| Call sentiments | Overall tone (for example, Neutral, Positive). |
| Call type | Type of call (for example, testing or production). |
| Campaign name | Campaign linked to the call, if any. |
| Call recording | Play the audio recording when available. |
| Call output extracted | Structured data pulled from the conversation. |
| Call transcripts | Full text of what was said on the call. |
Use View on transcripts and extracted output to understand why a call succeeded or failed, then improve the assistant prompt, pathway, Knowledge Base, or tools.
Logs (Historic and Live Calls)
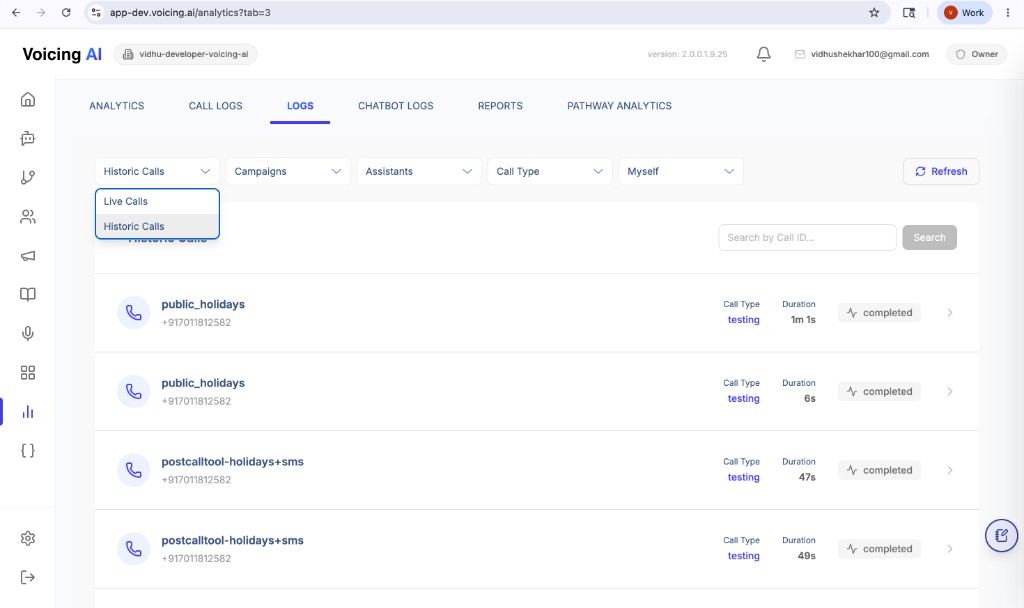
Open the Logs tab when you want a simpler call list with quick filters. This view is useful for day-to-day monitoring and spot-checking recent activity.
What you can do here:
| Control | What it does |
|---|---|
| Call state | Switch between Live Calls and Historic Calls. |
| Campaigns | Filter calls by campaign. |
| Assistants | Filter calls by assistant. |
| Call type | Filter by call type (for example, testing). |
| User | Filter by user (for example, Myself). |
| Search | Find a specific call using Search by Call ID. |
| Refresh | Reload the latest call list. |
Each log row shows the assistant/pathway name, phone number, call type, duration, and status (for example, completed). Click the arrow on a row to open more details for that call.
Chatbot Logs
If your assistant supports chat (not only voice calls), use the Chatbot Logs tab to review text conversations.
What you can review:
| Item | What it means |
|---|---|
| Assistant name | Which assistant handled the chat. |
| Duration | How long the chat session lasted. |
| Status | Whether the chat completed or ended early. |
| Search | Use Search chats to find a specific session. |
Use Chatbot Logs to check whether the assistant answered correctly, stayed on topic, and completed the conversation as expected.
Pathway Analytics
Open Pathway Analytics to see how callers move through a selected pathway. This helps you find drop-off points and improve the flow.
How to use it:
- Select a pathway from the Select Pathway dropdown.
- Turn on Show Only Traversed Nodes to hide steps that were never reached.
- Review the visual flow chart and note the Frequency on each node (how many times that step was reached).
- Check Top 5 Most Traversed Paths to see the most common routes callers took.
Example insight: if many calls start but few reach the next node, users may be disconnecting early or the opening step needs improvement.
What to check after calls or campaigns
Use Analytics to answer questions like:
- How many calls were attempted?
- How many calls connected or completed?
- How many calls failed or were not answered?
- How long did calls last?
- Did users complete the intended flow?
- Do transcripts show clear, helpful conversations?
- Are failures caused by contact data, provider settings, pathway issues, tools, or Knowledge Base answers?
Metrics to Review
| Metric | What it means | What to look for |
|---|---|---|
| Total calls | Number of calls attempted. | Confirms the campaign/test actually ran. |
| Connected calls | Calls that were answered or connected. | Shows usable call volume. |
| Failed calls | Calls that did not complete successfully. | High failures may mean contact/provider issues. |
| Call duration | Length of each call. | Very short calls may mean disconnects or poor opening prompt. |
| Average call duration | Average length across calls. | Helps compare test runs or campaigns. |
| Call status | Final state of each call. | Review completed, failed, transferred, no answer, etc. |
| Campaign performance | Summary of one campaign. | Helps compare contact lists and campaign setup. |
| Assistant performance | How one assistant performs across calls. | Helps improve prompt, tools, and pathway. |
| Transcripts/conversation logs | Text record of the call, if available. | Use this to see exactly what happened. |
| Sentiment or outcome | User mood or result label, if available. | Helps understand call quality. |
| Transfer count | Number of calls transferred, if available. | High transfers may mean the assistant is not resolving issues. |
Example Analytics Summary
| Metric | Example value |
|---|---|
| Total Calls | 100 |
| Connected Calls | 82 |
| Failed Calls | 18 |
| Average Duration | 2m 10s |
| Transferred Calls | 12 |
How to Interpret Results
| Pattern | Possible meaning | Suggested action |
|---|---|---|
| High failed calls | Contact list or calling provider issue. | Check phone number format and provider settings. |
| Very short call duration | Callers disconnect early or the opening message is weak. | Improve the first prompt and test again. |
| High transfer count | Assistant or pathway is not resolving enough queries. | Review transcripts and improve pathway/KB/tool coverage. |
| Low completion rate | Pathway, tool, or Knowledge Base issue. | Test each step and simplify the flow. |
| Confusing transcripts | Prompt may be too broad or unclear. | Rewrite prompt with clearer instructions. |
11. API Flow
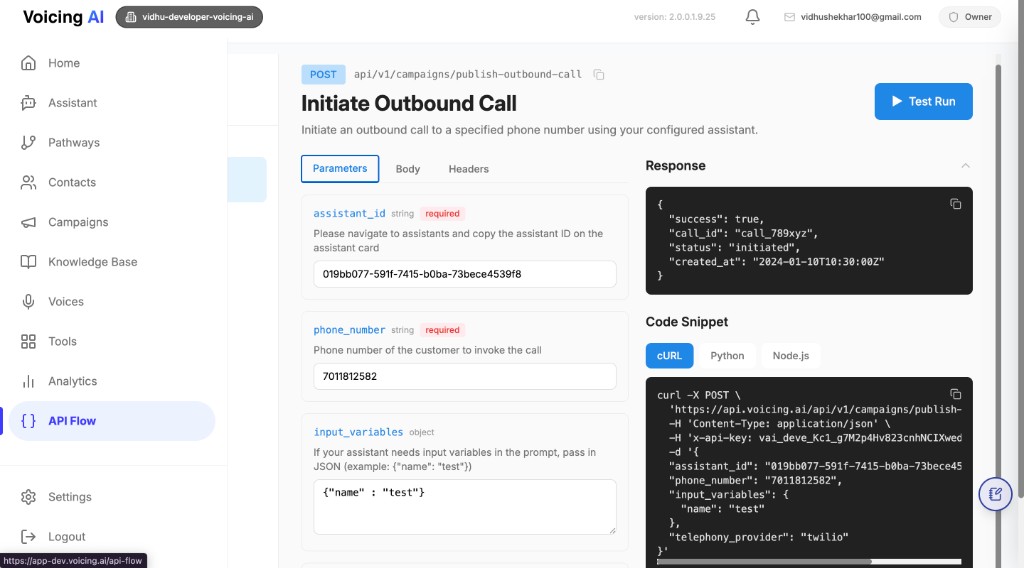
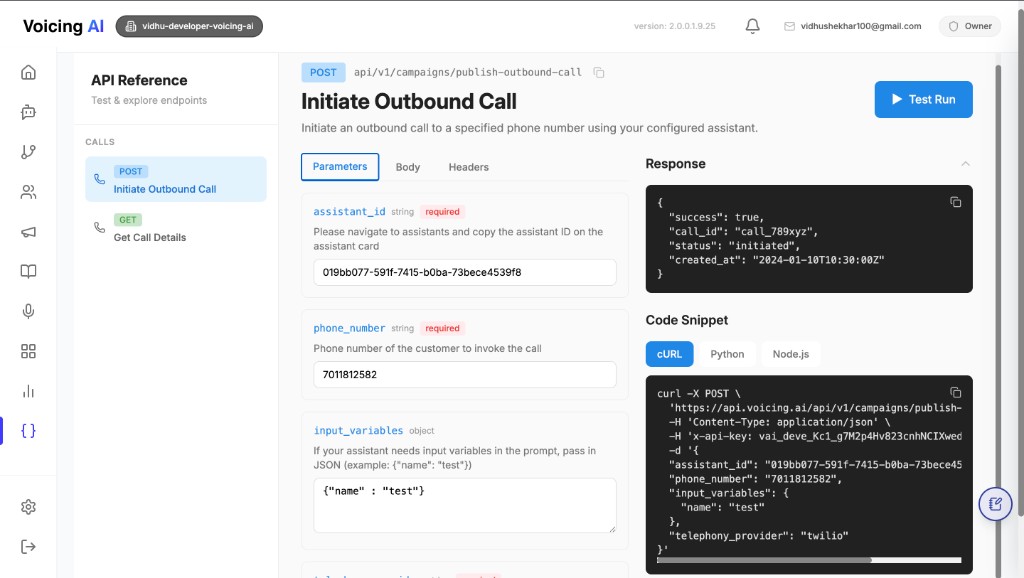
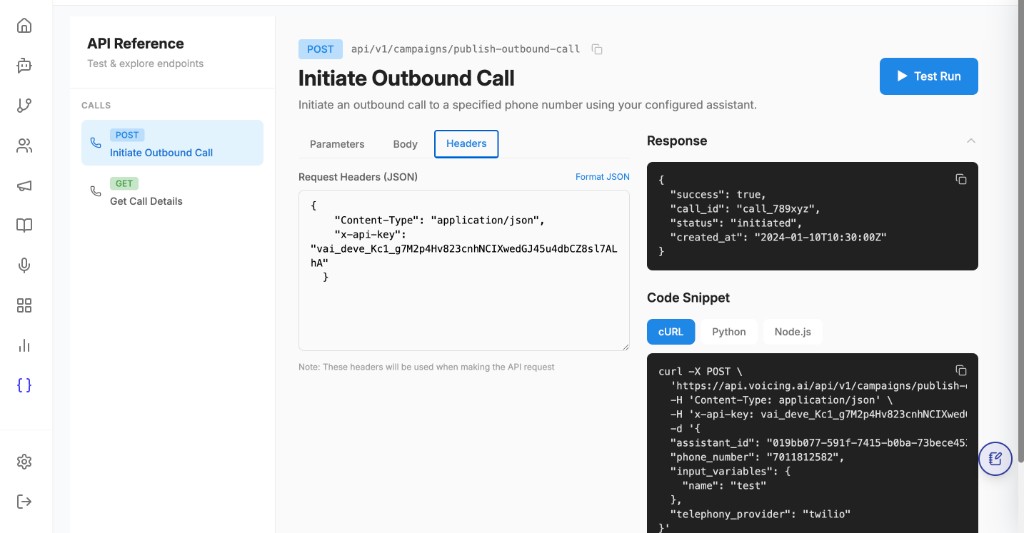
API Flow (also shown as API Reference in the product) lets you start outbound calls and check call details using HTTP APIs. This is useful when your own system (CRM, billing, support desk) needs to trigger a call automatically instead of starting a campaign manually in the UI.
What API Flow is used for
- Start an outbound call to a phone number using a selected assistant.
- Pass dynamic data to the assistant (for example, customer name or plan type).
- Track a call using the
call_idreturned after the call starts. - Fetch call details (status, duration, timestamps) with a GET request.
Open API Flow in the platform
- In the left sidebar, click API Flow (near the bottom, after Analytics).
- Under CALLS, you will typically see:
- POST Initiate Outbound Call — start a call
- GET Get Call Details — look up a call by
call_id
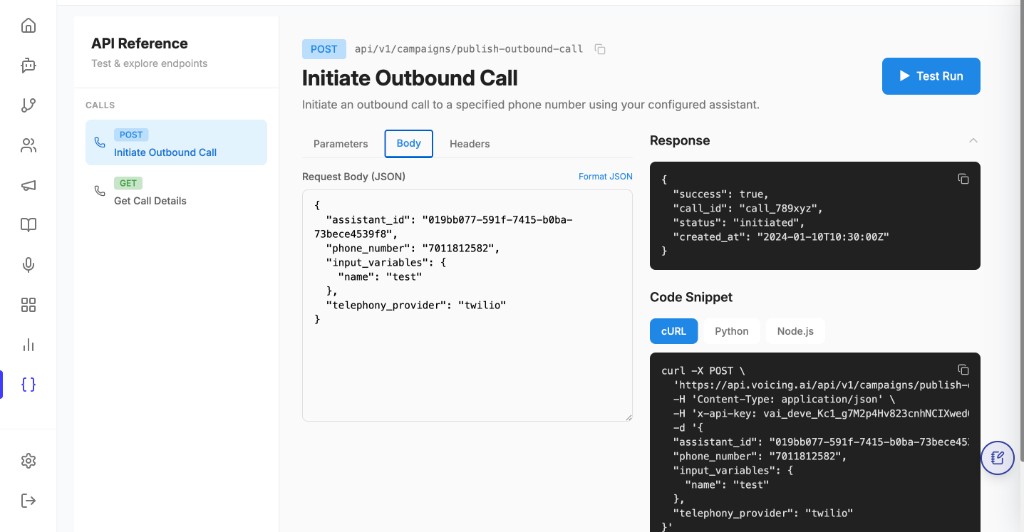
- Use Parameters, Body, and Headers tabs to see required fields.
- Use Test Run or copy a code snippet (cURL, Python, Node.js) to try the API safely.
High-level API workflow
- Create or copy an assistant and note its
assistant_id. - If the assistant prompt uses placeholders (for example
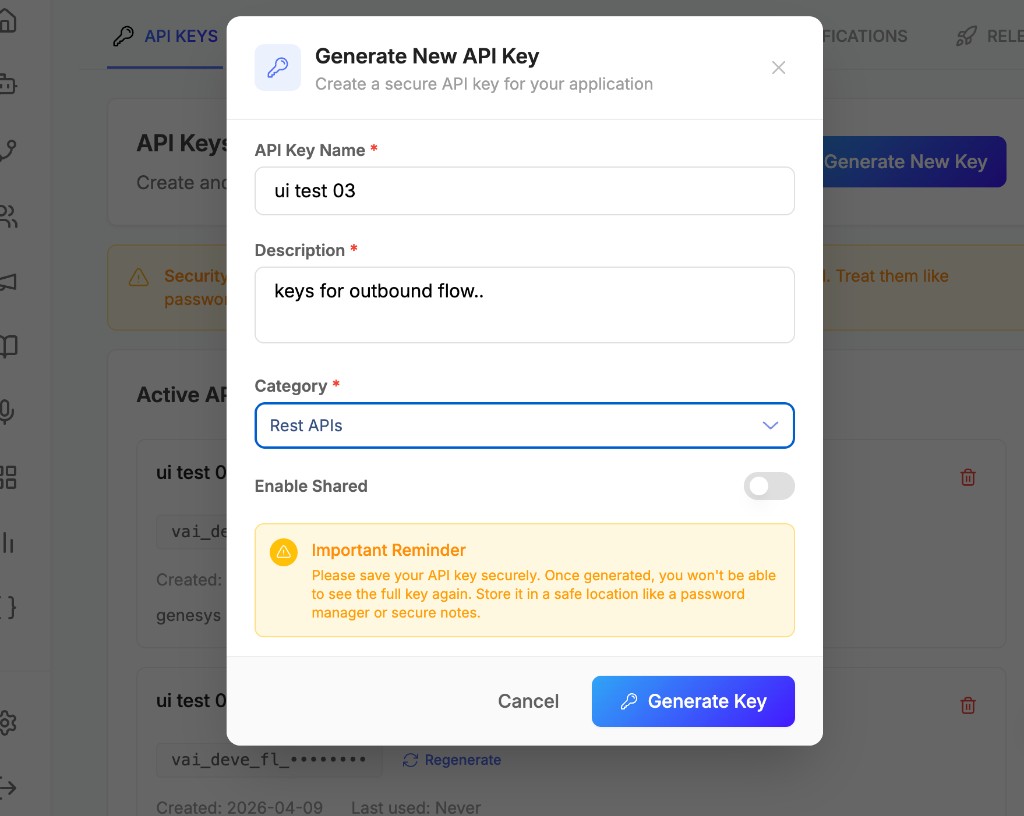
{{name}}), prepare matching keys ininput_variables. - Create an API key under the Rest APIs category.
- Call POST
publish-outbound-callwith the destinationphone_numberandassistant_id. - Save the returned
call_id. - Use GET
get-call-details(and Analytics in the UI) to review the call outcome.
Authentication (API keys)
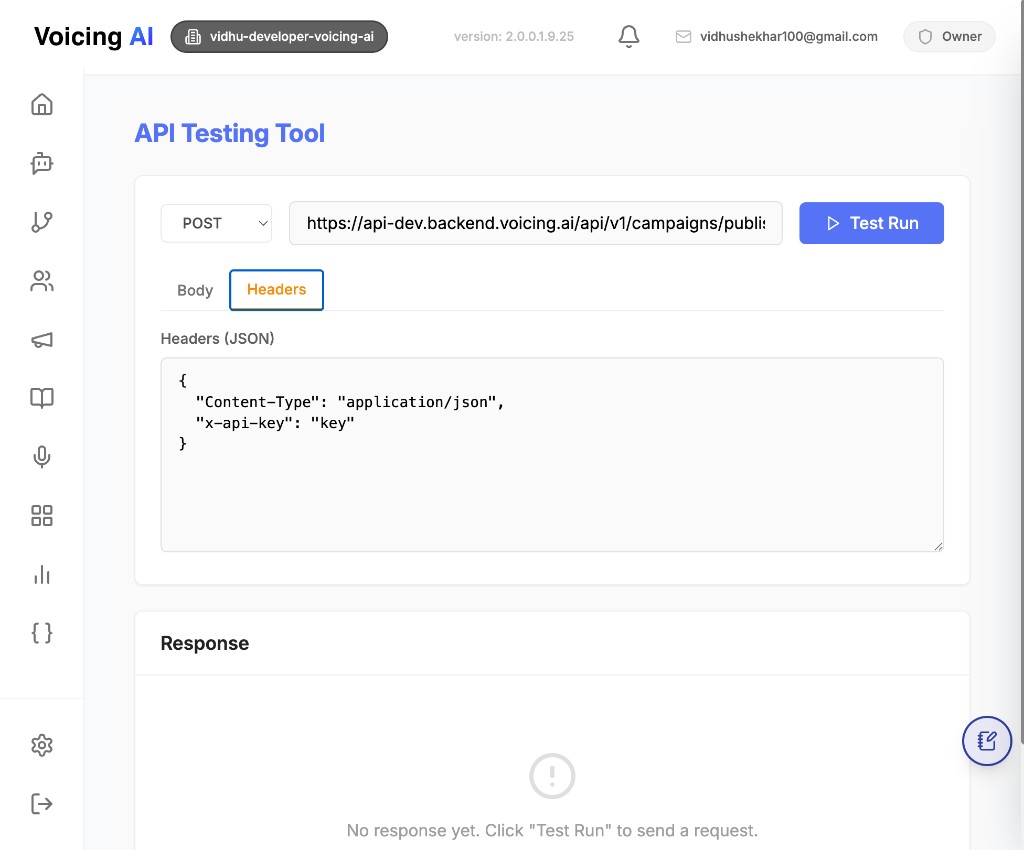
Every API request needs:
| Header | Purpose |
|---|---|
Content-Type: application/json | Tells the API you are sending JSON. |
x-api-key | Your secret API key for authentication. |
Generate keys that are saved under the Rest APIs category. Those keys are intended for outbound and related REST flows.
POST: Start an outbound call
Purpose: Ask Voicing AI to call a phone number using a specific assistant.
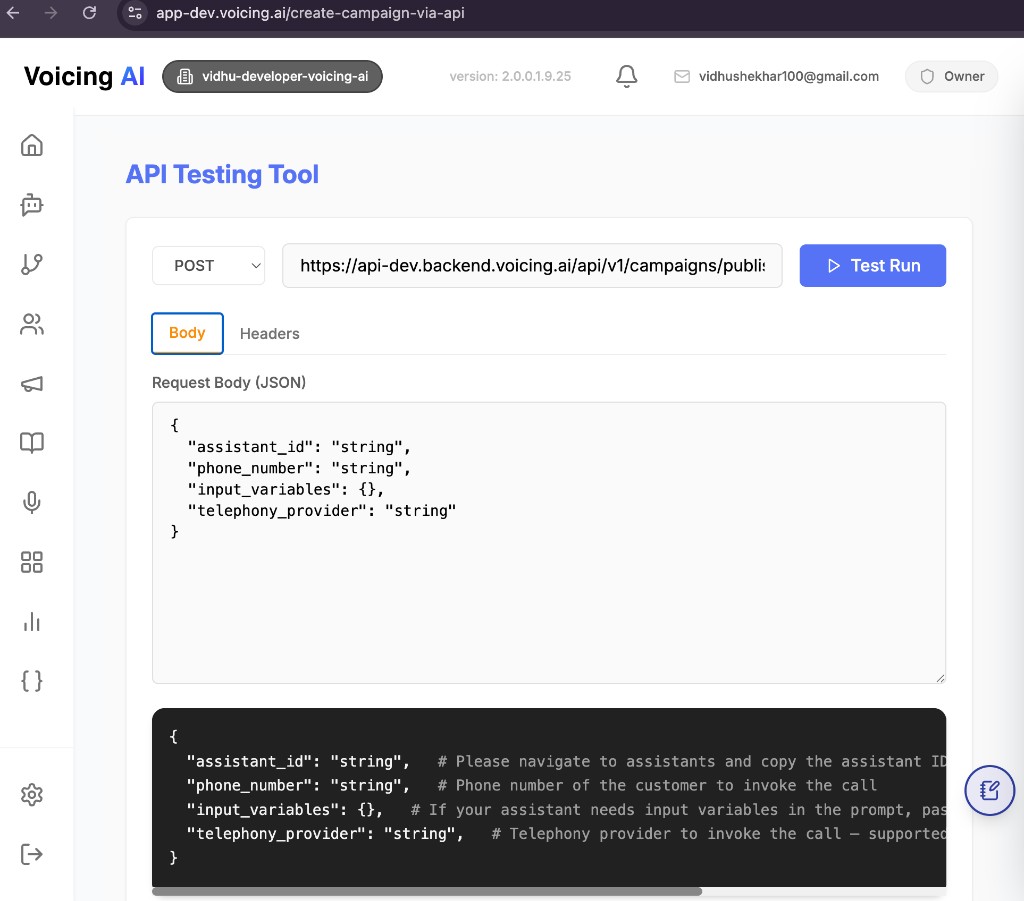
Typical request body fields:
| Field | Required | What it means |
|---|---|---|
assistant_id | Yes | ID of the assistant that will handle the call. |
phone_number | Yes | Number to call (E.164 format recommended, e.g. +17018112582). |
input_variables | Optional | Dynamic values for placeholders in the assistant prompt. |
telephony_provider | Yes | Calling provider (for example "default"). |
Example prompt with variables:
Hi {{name}}, your {{plan_type}} plan payment is pending.
Matching input_variables:
{
  "name": "John Doe",
  "plan_type": "Premium"
}
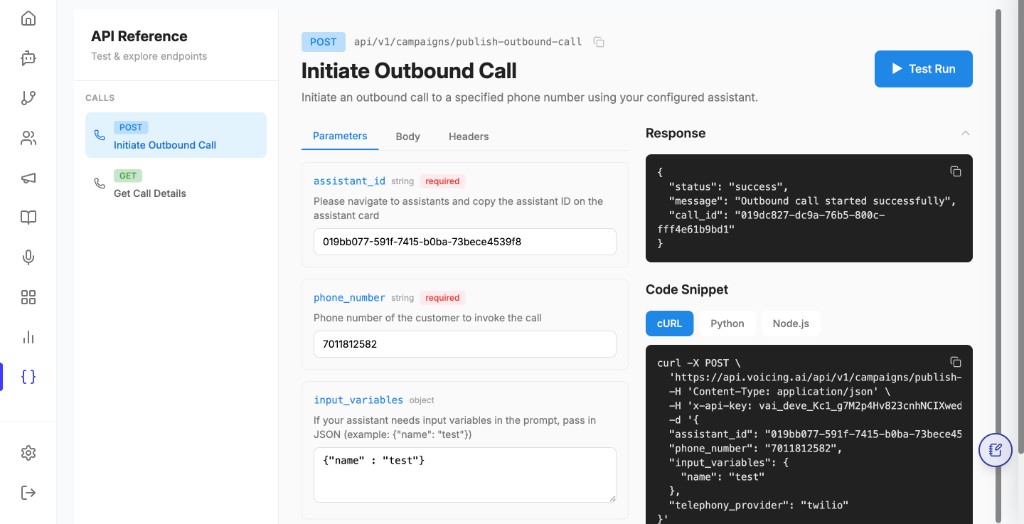
Example success response:
{
  "status": "success",
  "message": "Outbound call started successfully",
  "call_id": "f4a0e9b1-1234-4e8a-9c56-abcdef123456"
}
Store call_id in your system. You will need it to fetch call details and to correlate with Analytics and call logs.
Common issues (beginner checks):
| HTTP status | Likely cause | What to do |
|---|---|---|
| 400 | Missing/invalid fields or bad JSON | Check required fields and JSON format. |
| 401 | Wrong or missing API key | Use a valid Rest APIs key in x-api-key. |
| 404 | Assistant not found | Confirm assistant_id from the Assistants page. |
| 500 | Server or publish error | Retry; check telephony provider configuration. |
GET: Get call details
After a call is started, use GET Get Call Details with the call_id to check status and metadata (for example completed, duration, start/end time).
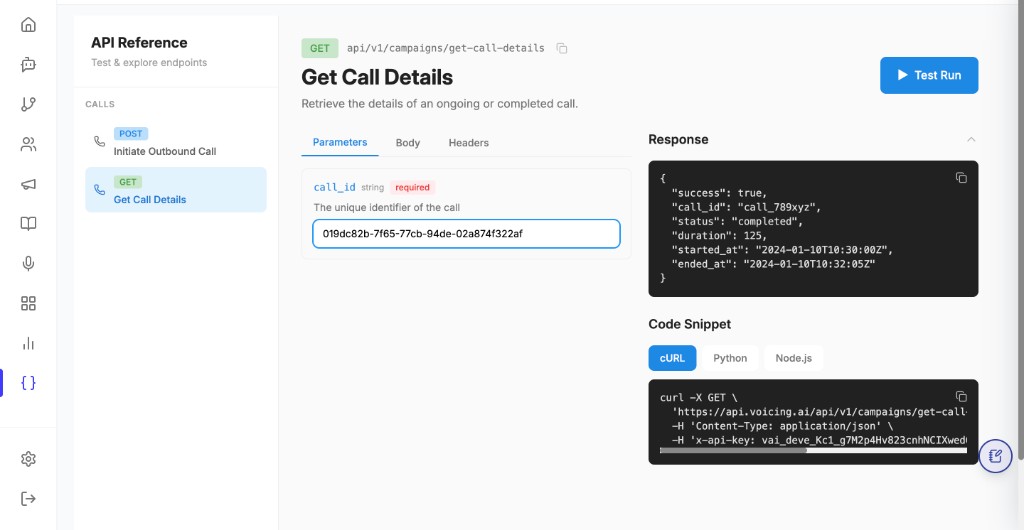
Use this together with Analytics and Call Logs in the UI for a complete picture of what happened on the call.
API Flow best practices
- Test POST Initiate Outbound Call in API Reference with a test number before production use.
- Make sure
input_variableskeys match placeholder names in the assistant prompt. - Use E.164 phone numbers when possible.
- Never share or commit API keys; store them in a secure secret manager.
- Log
call_idin your application so support and engineering can trace each call.
12. Practical Example: New User Onboarding Flow
Scenario: A newcomer wants to set up a support assistant and check performance.
- Select the correct workspace.
- Open Assistants.
- Create or select Customer Support Assistant.
- Add a simple support prompt.
- Choose voice and conversation settings.
- Link the support Knowledge Base.
- Create a pathway:
Start Call -> Greet Customer -> Ask Issue -> Check Knowledge Base -> Create Ticket or Transfer -> End Call
- Add a tool if ticket creation or ticket lookup is required.
- Upload a small test contact list.
- Run one test call or a small test campaign.
- Open Analytics.
- Review call status, duration, transcript, outcome, and transfer count.
- Update prompt, pathway, Knowledge Base, or tools based on what Analytics shows.
13. Screenshot Reference
Screenshots are included in each section above. Use this list as a quick index when training a new user:
| Area | Section |
|---|---|
| Login page | Section 2 |
| Platform sidebar | Section 3 |
| Assistant settings, prompt, conversation | Section 5 |
| Pathway builder | Section 6 |
| Knowledge Base | Section 7 |
| Tools | Section 8 |
| Contacts and campaigns | Section 9 |
| Analytics (all tabs) | Section 10 |
| API Flow | Section 11 |
14. Downloadable Version
This page is designed as a single printable onboarding document.
To download it as PDF with better page layout:
- Open this guide in the browser.
- Press
Cmd + P(orCtrl + Pon Windows). - Set Destination to Save as PDF.
- Set Layout to Portrait (recommended for this guide).
- Set Margins to Default or Minimum.
- Enable Background graphics so images print correctly.
- Click Save.
Tips if pages break awkwardly:
- Use Portrait, not Landscape.
- Avoid scaling above 100% in the print dialog.
- Each section already includes screenshots inline; you do not need duplicate images when printing.
- If a section still splits across pages, zoom out slightly (for example 90%) before saving as PDF.
15. Troubleshooting
| Problem | Beginner-friendly checks |
|---|---|
| Cannot see assistant | Confirm the correct workspace, permissions, filters, and search text. |
| Knowledge Base not answering | Confirm the file uploaded, processing completed, and the assistant is linked to the right KB. |
| Campaign not starting | Check contact formatting, selected assistant, provider/settings, and required campaign fields. |
| Analytics not updated | Wait a few minutes, refresh, and confirm calls actually started or completed. |
| Calls failing | Check phone number format, country code, provider status, and campaign setup. |
| Tool/API failing | Confirm tool credentials, required inputs, and that the tool works in a test run. |
| API Flow call not starting | Check Rest APIs key, assistant_id, phone format, and telephony_provider. |
| API returns 401 | Regenerate or copy the correct Rest APIs key into x-api-key. |
16. Best Practices
- Use clear assistant prompts with one goal at a time.
- Test with one call before starting a full campaign.
- Keep the first pathway simple.
- Check Analytics after every test.
- Review transcripts to understand real user conversations.
- Update the Knowledge Base regularly.
- Use screenshots and examples during onboarding.
- Improve the assistant in small steps instead of changing everything at once.