Tools Guide
Tools in the Voicing AI platform extend the capability of your assistant by enabling it to fetch information, perform tasks, and interact with external systems. Tools can connect with external APIs, internal workflows, or custom MCP servers to bring powerful capabilities into your conversational experience.
This guide explains how tools work, how to configure them, how they interact with pathways, and how to build your own MCP-powered tools.
Table of Contents
- Overview
- How Tools Work
- Tool Types
- Tool Structure
- Using Tools in Pathways
- Tool Execution Flow
- MCP Server Tools
- Knowledge Base Tool Template
- Webhook Tools
- Call Details Tool Template (Post-Call)
- Error Handling & Retries
- Best Practices
1. Overview
Tools allow your assistant to perform real actions: retrieving data, executing workflows, making decisions, or integrating with third-party systems.
Examples:
- Calendar scheduling
- AQI / Weather lookups
- CRM or Ticketing API calls
- Phone number validation
- Custom business logic
- MCP-based integrations
Tools run during live conversations and return structured data that impacts the flow.
2. How Tools Work
- Pathway collects required inputs
- Action Node invokes a tool
- Tool sends request to its backend (REST or MCP)
- Backend processes
- Tool returns structured output
- Output variables are added to context
- Flow continues based on edge conditions
Tools do not speak — they only provide data.
3. Tool Types
1. Action Tools
Perform operational tasks:
- API calls
- Database lookups
- Validation
- Workflow triggers
2. Data Tools
Return useful external data:
- AQI
- Weather
- Timezone
- Holiday info
3. Integration Tools
Large external systems:
- Calendar MCP
- CRM systems
- Internal company APIs
4. Custom Tools
You create your own:
- Custom API endpoints
- Custom MCP servers
- Internal microservices
4. Tool Structure
Tool Metadata
| Field | Description |
|---|---|
| Name | Unique tool identifier |
| Description | What the tool does |
| Category | Type of tool |
| Icon | UI representation |
| Enabled | Whether assistant can call it |
Input Variables
Inputs passed to the tool backend.
| Field | Description |
|---|---|
| Name | Variable name |
| Type | string, integer, boolean, array, object |
| Required | Yes/No |
| Description | Meaning of the field |
Example:
{
  "title": "Meeting with HR",
  "date": "2025-01-10T14:00:00Z"
}
Output Variables
Values returned back into assistant context.
Example:
{
  "event_id": "92asd913as",
  "status": "success"
}
Outputs determine the next step in the pathway.
5. Using Tools in Pathways
Tools are invoked inside Action Nodes.
Example flow:
Extract user input → Call tool → Receive outputs → Route to next node
Edge example:
IF status == "success" → Success Node
ELSE → Fallback Node
Outputs remain available across all downstream nodes.
6. Tool Execution Flow
[Conversation Node]
        ↓
[Data Extraction]
        ↓
[Action Node → Tool]
        ↓
[Tool Backend Processes]
        ↓
Outputs added to context
        ↓
Edge logic chooses next step
7. MCP Server Tools
MCP (Model Context Protocol) tools allow your assistant to connect to a remote server that exposes functional capabilities through a standardized protocol. MCP enables you to bring custom, scalable, secure backend logic into your assistant without hardcoding or embedding API schemas manually.
MCP tools behave like dynamic, discoverable toolsets that your assistant can invoke at runtime.
7.1 What Is MCP?
MCP (Model Context Protocol) is a protocol introduced to allow AI systems to interact with tools, APIs, and external resources in a predictable, structured way.
It provides:
- Standardized transport
- Secure authentication
- Dynamic tool discovery
- Structured tool schemas
- Stable inputs/outputs
- Server-side execution
In Voicing AI, MCP lets you plug your own “tool server” behind your assistant.
Your MCP server exposes:
- tool definitions
- input/output schemas
- functions
- metadata
- descriptions
The platform automatically discovers these capabilities.
7.2 Why Use MCP Tools?
MCP tools are ideal when you need:
1. Custom Business Logic
Example:
- Generate invoice numbers
- Validate internal user data
- Trigger internal workflows
2. Private / Secure Integrations
MCP servers live inside secured environments.
Perfect for:
- On-prem APIs
- VPC-only systems
- Internal microservices
3. Dynamic Tool Discovery
Instead of manually defining tool specifications, MCP returns resources:
- Tool names
- Input fields
- Output fields
- Descriptions
Everything is generated by the server on request.
4. AI Agents Capabilities
LLM-powered logic on the server can:
- Plan
- Decide
- Sequence operations
- Access multiple APIs
- Return simplified output
The assistant just calls the MCP tool — everything else happens server-side.
7.3 MCP Tool UI Fields (Detailed Breakdown)
When creating or updating an MCP tool, the Voicing AI UI exposes:
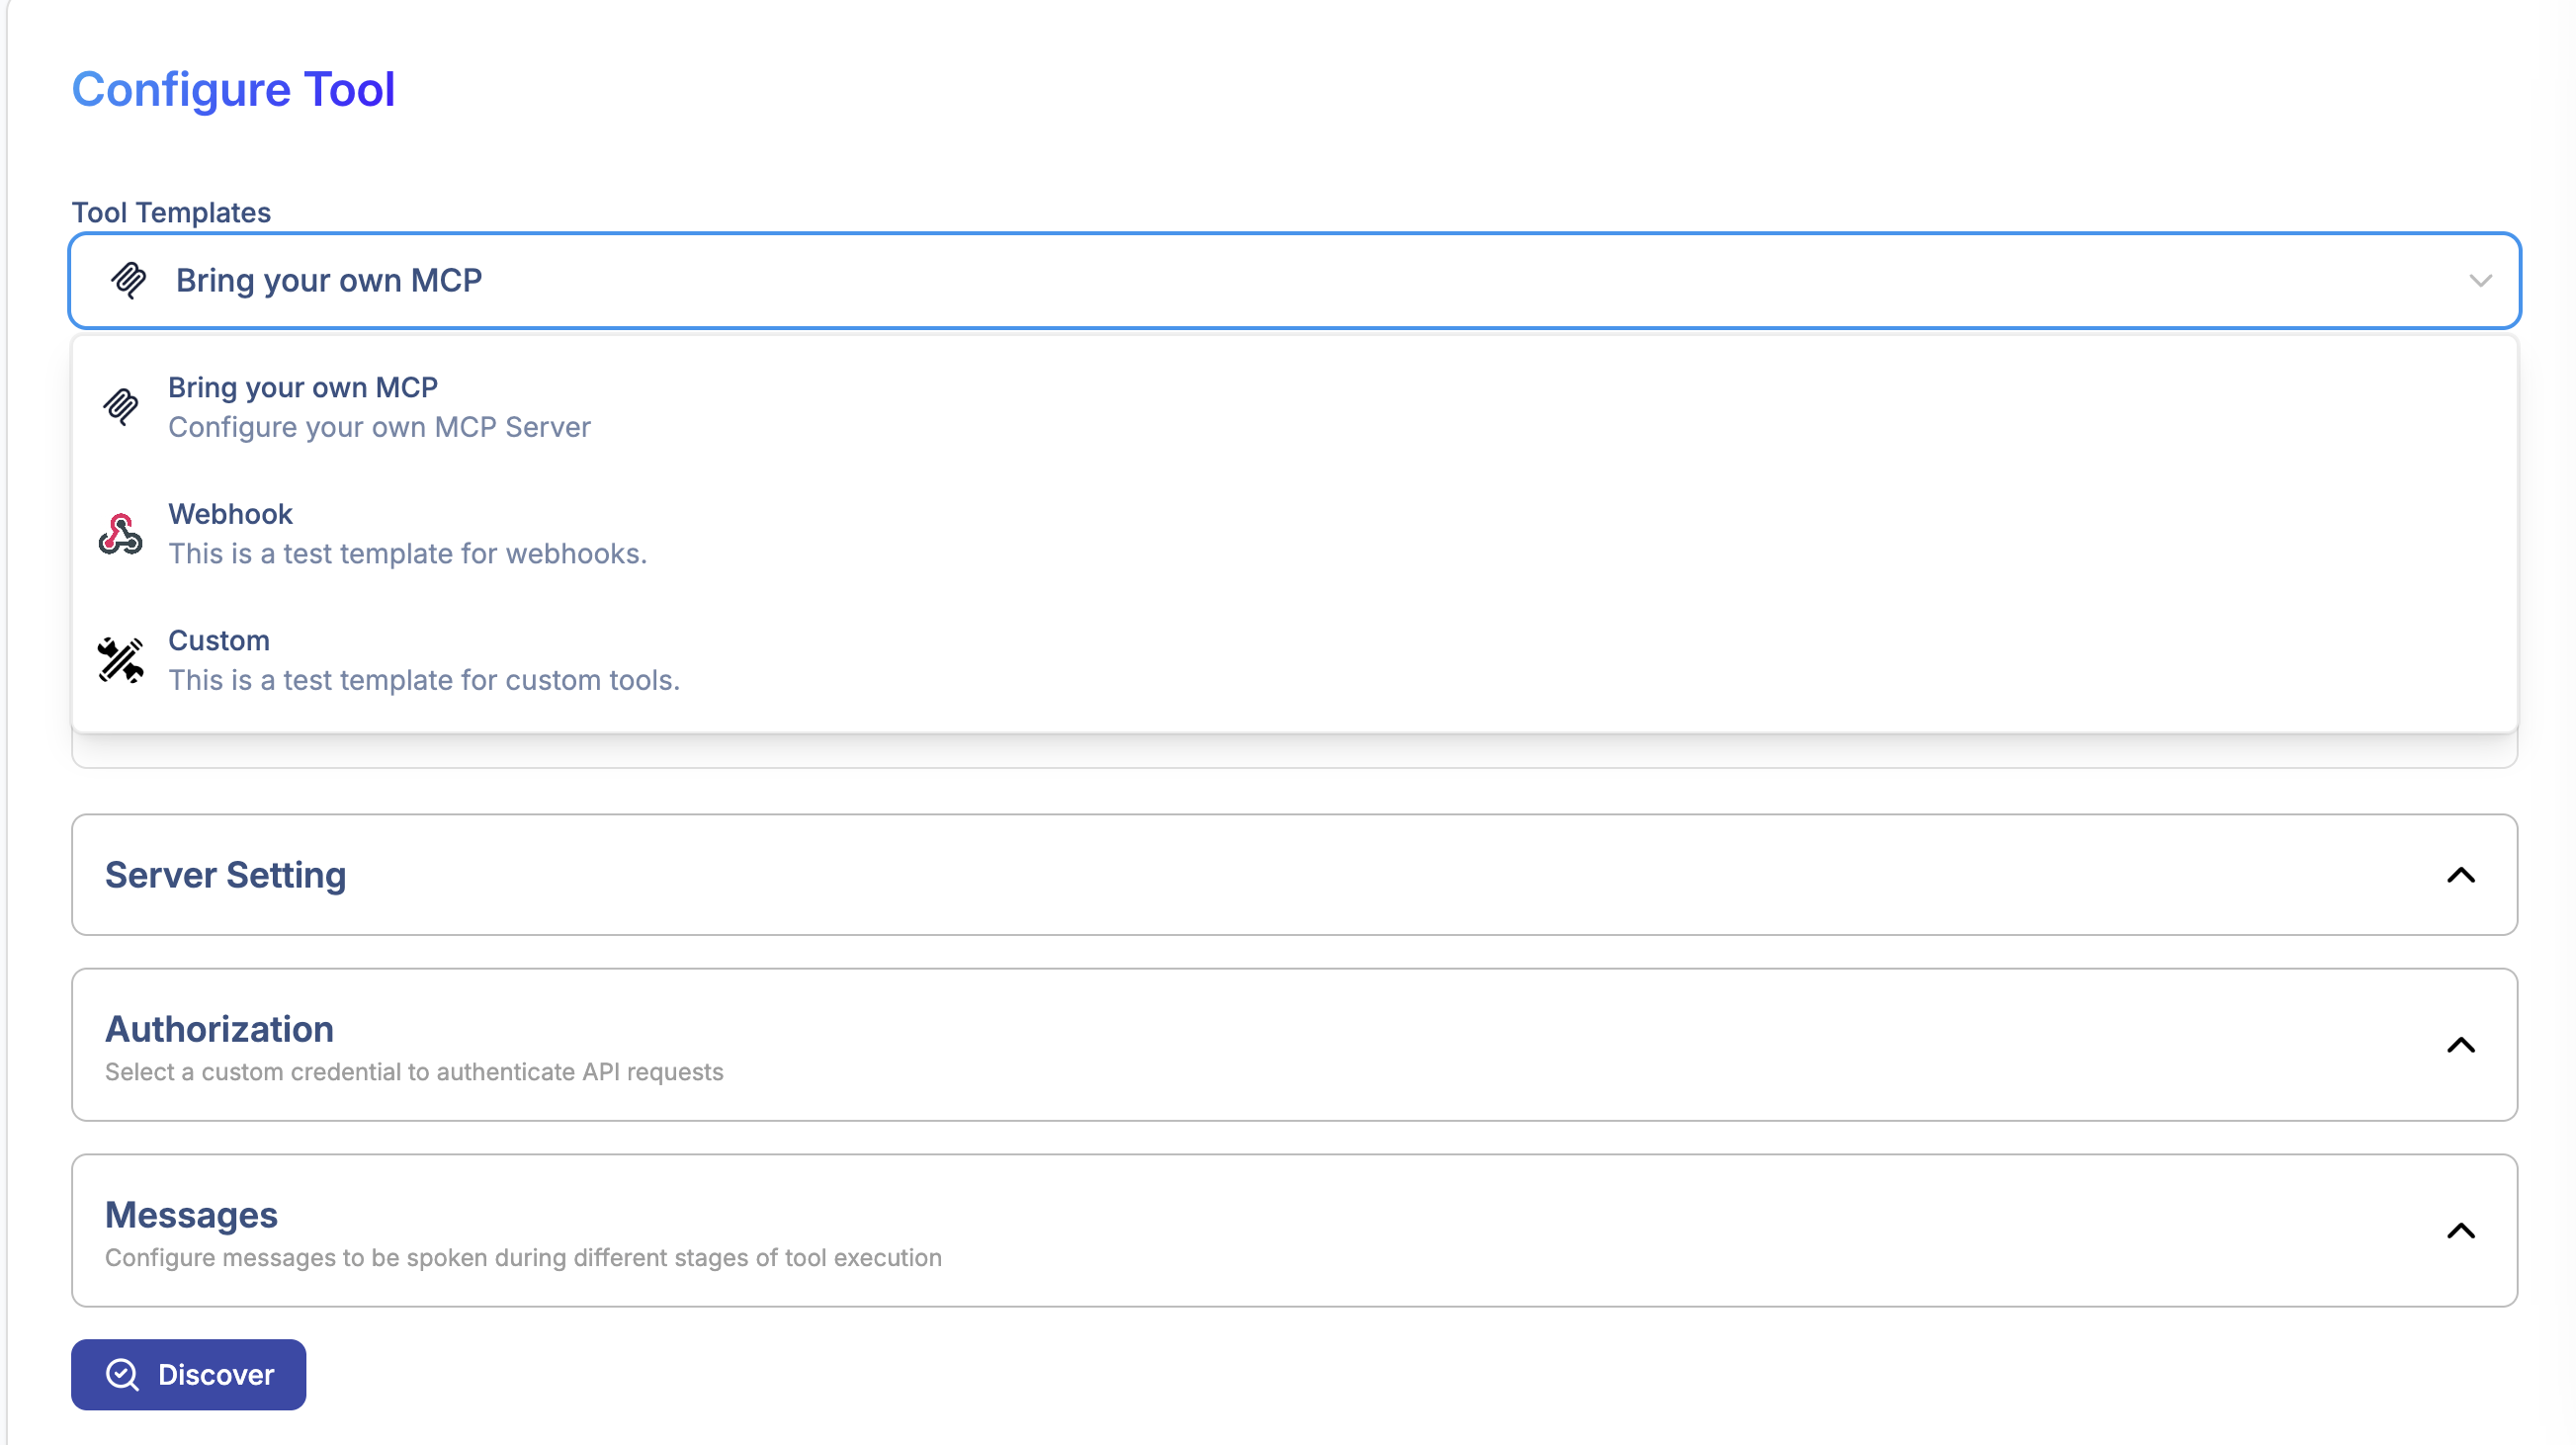
Tool Templates
Bring your own MCP
This means you're providing the MCP endpoint.
Tool Name
- Must be unique within the workspace
- Avoid spaces or uppercase
Example:
calendarmcp
Customer / Account Name
Used to group tools under an organization or environment.
Example:
abc-dev-account
Description
Explain the tool's purpose.
Example:
Calendar MCP integration tool for event scheduling.
7.4 Server Settings
This is where you connect your MCP backend.
Server URL
https://api-dev.mcp.voicing.ai/mcp
This is the endpoint that implements:
/discover/execute- Optional:
/status,/auth, etc.
The platform sends MCP requests to this server.
7.5 Authorization
MCP requires secure access.
Supported auth methods:
- API keys
- Service accounts
- Bearer tokens
- Custom headers
- OAuth tokens
Authorization ensures:
- Only your assistant can call your MCP server
- Internal data is protected
- Tool usage is logged and attributed
You attach credentials through:
Authorization → Custom Credential
7.6 Tool Discovery
The Discover button triggers:
POST <server_url>/discover
The MCP server returns a full schema such as:
{
  "tools": [
    {
      "name": "create_event",
      "description": "Create a calendar event",
      "input_schema": {
        "title": "string",
        "start_datetime": "string",
        "end_datetime": "string",
        "attendees": "array"
      },
      "output_schema": {
        "event_id": "string",
        "status": "string"
      }
    },
    {
      "name": "list_calendars",
      "description": "Fetch all calendars",
      "input_schema": {},
      "output_schema": {
        "calendars": "array"
      }
    }
  ]
}
The platform uses this to:
- Display tool functions
- Auto-generate UI for input mapping
- Validate types
- Understand outputs
The developer does not manually configure schemas — the MCP server provides them.
7.7 MCP Tool Execution
When an Action Node calls an MCP tool, the platform sends:
1. Execution Request
POST <server_url>/execute
With payload:
{
  "tool": "create_event",
  "inputs": {
    "title": "Meeting",
    "start_datetime": "2025-01-10T13:00:00Z",
    "end_datetime": "2025-01-10T14:00:00Z",
    "attendees": ["abc@voicing.ai"]
  }
}
2. Server Runs Logic
- MCP server handles validation
- Connects to APIs
- Executes workflow
- Cleans/normalizes outputs
3. Server Returns Results
{
  "event_id": "cal_238197",
  "status": "scheduled"
}
4. Voicing AI Stores Outputs
Outputs get added to conversation context:
event_id → cal_238197
status → scheduled
5. Edges Use Outputs
Pathways evaluate:
IF (status == "scheduled") → Success Node
ELSE → TryAgain Node
7.8 How MCP Tools Integrate Into Pathways
Inside an Action Node, select:
Tool: googlecalendarmcp.create_event
Then map inputs:
{
  "title": "{meeting_title}",
  "start_datetime": "{start_time}",
  "end_datetime": "{end_time}",
  "attendees": "{email_list}"
}
After the MCP server processes the request, outputs become context variables for routing and prompts.
Example prompt:
Your meeting has been created. Event ID is {event_id}.
7.9 Example MCP Workflow (End-to-End)
User says: "Schedule a meeting tomorrow at 3 PM with Manshu."
↓
Conversation Node: Extract meeting details
↓
Extraction Node: Extract date/time & attendees
↓
Action Node: Call MCP tool (create_event)
↓
MCP server schedules the event
↓
Returns event_id + status
↓
Conversation Node: Confirm success to user
7.10 MCP Tool Debugging
- Open Pathway Logs → Action Node
- Check:
- Input mapping
- Output values
- Error codes
- Verify MCP server logs for:
- Request payloads
- Authentication failures
- Rate limits
- Invalid input schema
- Re-run discovery if schemas changed
7.11 Common MCP Errors
| Error | Meaning | Fix |
|---|---|---|
Schema mismatch | Inputs don’t match MCP schema | Run Discover again |
Unauthorized | Wrong credentials | Update Authorization field |
Tool not found | Server schema changed | Refresh tool list |
Timeout | Slow backend | Increase timeout, check server |
Empty output | MCP logic returned nothing | Review server response |
7.12 When to NOT Use MCP
Avoid MCP if:
- You just need a simple REST API call
- You don’t need dynamic schema discovery
- Your workflow never changes
Use built-in REST tools instead.
7.13 When MCP Is the Perfect Choice
Choose MCP when you need:
- Complex backend logic
- Multiple APIs orchestrated together
- Internal-only network access
- Zero schema maintenance in UI
- Agent-like capabilities
- Dynamic tools that evolve over time
MCP is the most scalable way to build advanced tools.
8. Knowledge Base Tool Template
The Knowledge Base Tool template lets you directly attach one of your Knowledge Bases to a tool. This is useful when you want your assistant to fetch answers from curated documents (FAQs, policies, product docs, internal SOPs) as part of a live conversation.
Once configured, the Knowledge Base Tool can be reused in:
- Pathways: call it from a node and route the flow based on the returned result
- Assistants: use it as an integrated capability during conversations
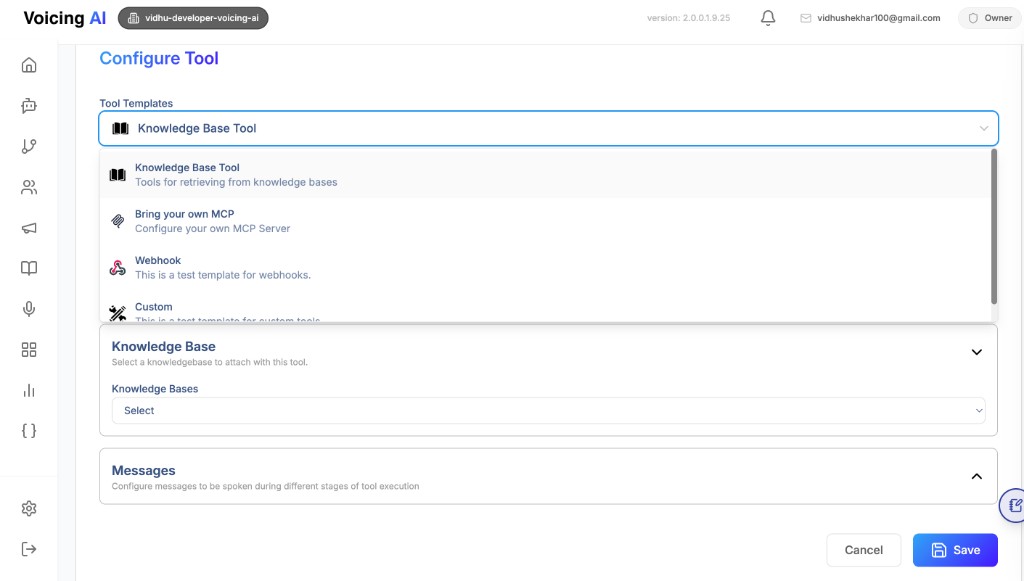
What you configure
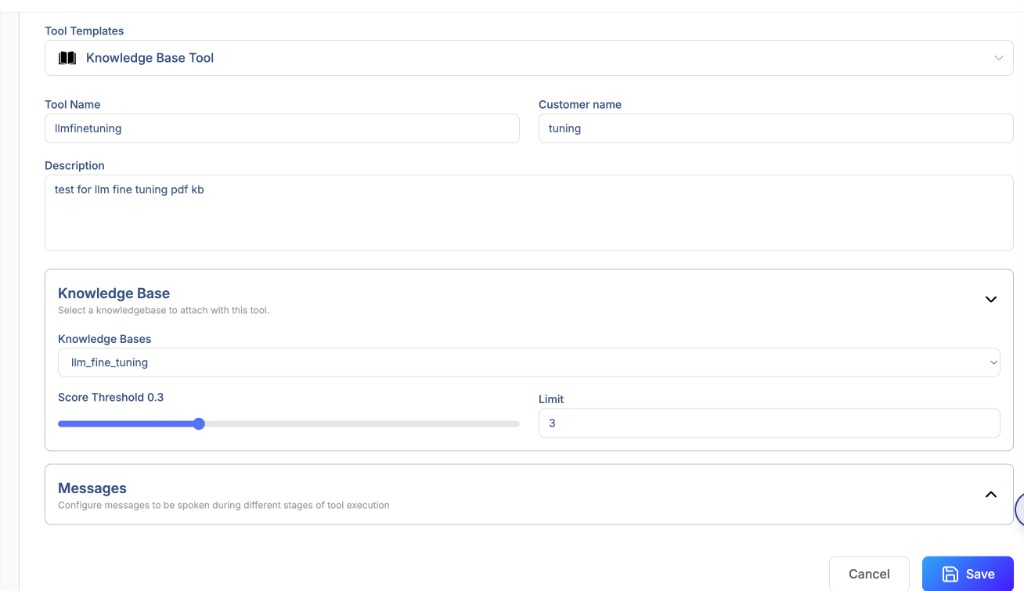
When you choose the template, you typically configure:
- Tool name / description: how it appears when selecting tools
- Customer / account name: grouping for your workspace / environment
- Knowledge Base selection: which KB this tool should query
- Score threshold: controls how strict retrieval should be (higher = stricter)
- Limit: how many top results to retrieve (small values keep responses focused)
- Messages (optional): what the assistant should say during tool execution (if enabled in the UI)
How you use it in Pathways and Assistants
- In Pathways: select the Knowledge Base Tool in the relevant node, map inputs (like the user question), and use the outputs (like retrieved text / citations) to continue the conversation or branch to different steps.
- In Assistants: attach the tool so the assistant can retrieve and use Knowledge Base information while answering users, keeping replies grounded in your own content.
Best practices
- Keep Knowledge Bases focused (avoid mixing unrelated topics in one KB).
- Start with a conservative limit (e.g., 3–5) and increase only if needed.
- Tune score threshold to avoid low-quality matches.
- Keep tool descriptions clear so builders can select the right tool quickly.
9. Webhook Tools
Webhook Tools allow your assistant to call external HTTP APIs using simple GET or POST requests. They are the fastest way to integrate public APIs, internal services, or lightweight endpoints without requiring MCP or complex schemas. Webhook responses are returned as structured JSON, mapped into context variables, and used immediately inside your Pathways for routing, prompts, and decision logic.
9.1 When to Use Webhook Tools
Webhook Tools are ideal for:
- Quick integrations
- Simple REST APIs (GET or POST)
- Public APIs (AQI, weather, currency, data APIs)
- Lightweight internal microservices
- Services that already return clean JSON
- Situations where dynamic schemas (MCP) are unnecessary
- Rapid prototyping and production-ready lightweight tools
Use Webhook Tools when your integration only requires making an HTTP call and processing the returned data.
9.2 Creating a Webhook Tool
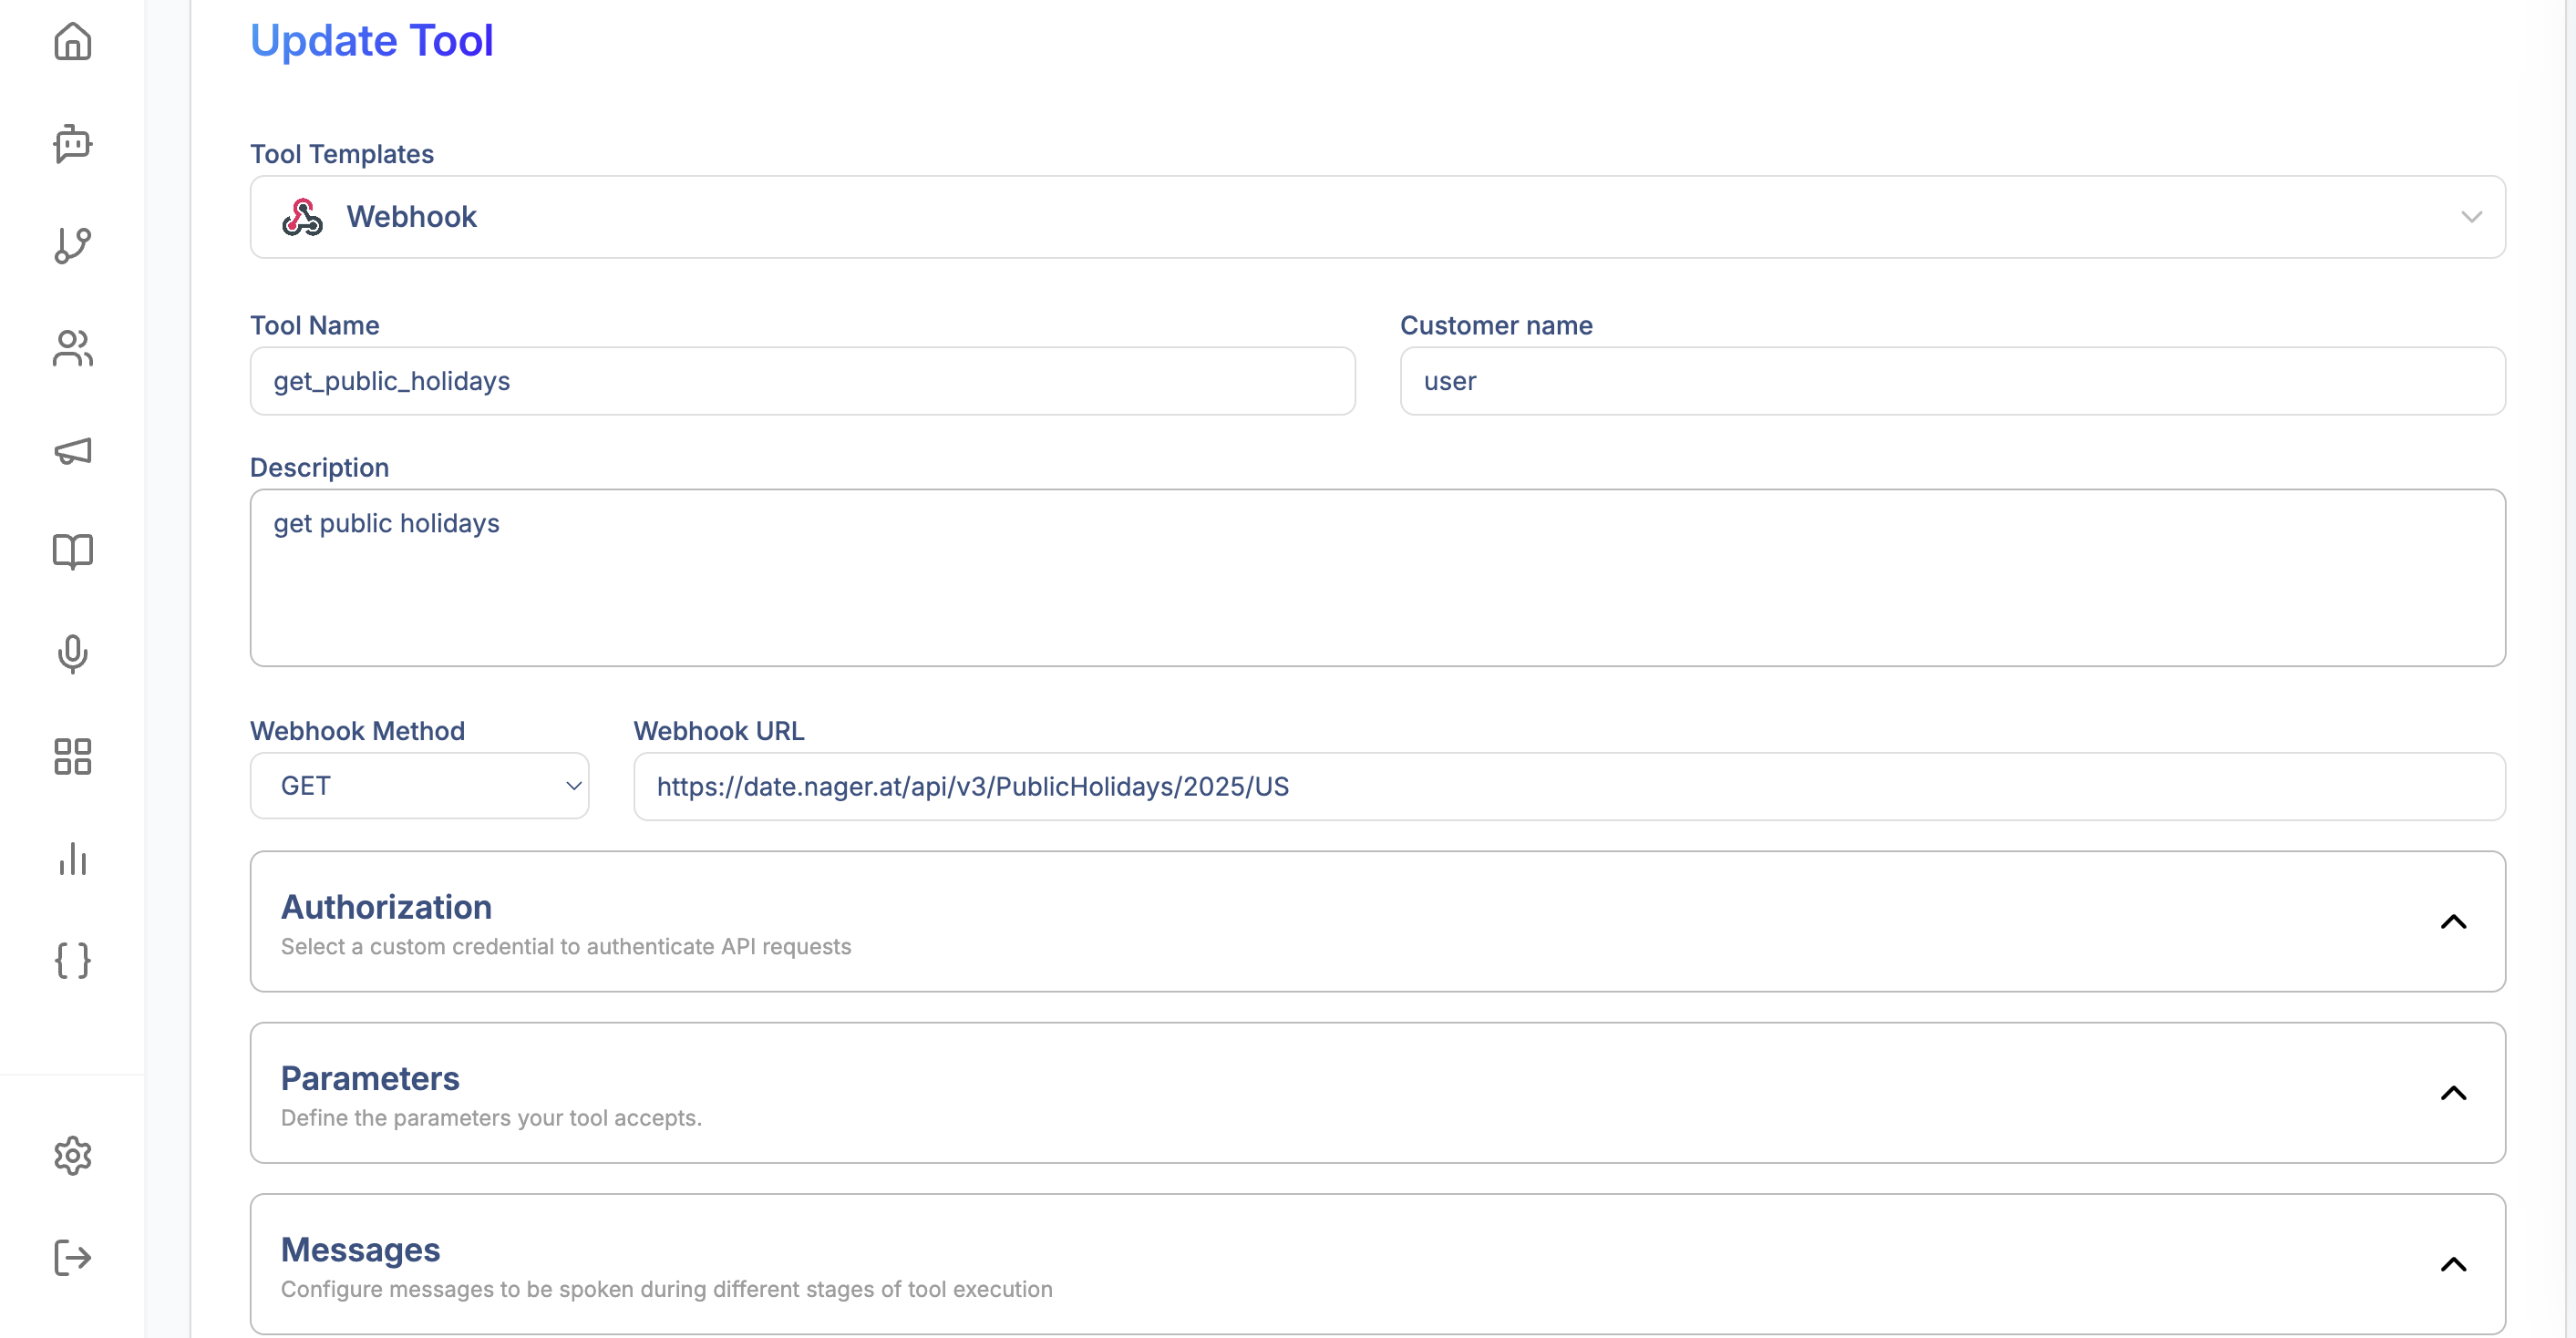
To create a Webhook Tool, configure the following fields in Voicing AI:
| Field | Description |
|---|---|
| Tool Template | Must be set to Webhook |
| Tool Name | Unique identifier such as aqidelhi |
| Customer Name | Associated organization or workspace |
| Description | Explanation of what the tool does |
| Webhook Method | GET or POST |
| Webhook URL | API endpoint |
| Authorization | Credentials for secure APIs |
| Parameters | Query parameters appended to the URL |
| Headers | Custom headers such as tokens or API keys |
| Body (POST only) | JSON payload for POST requests |
| Messages | Optional success / failure messages |
| Output Mapping | Map values from API response to variables |
The assistant uses these outputs to generate dynamic responses and route logic.
9.3 Webhook Methods
Webhook tools support two methods:
GET
Used to retrieve data such as:
- AQI index
- Weather forecasts
- Exchange rates
- Public datasets
- Basic information lookups
POST
Used when you need to:
- Submit data
- Create or update a resource
- Trigger workflows
- Send form data
POST tools require a request body (JSON).
9.4 Webhook URL
The URL specifies where the tool will make the HTTP request.
Example:
https://air-quality-api.open-meteo.com/v1/air-quality
The platform automatically attaches query parameters defined in the Parameters section.
9.5 Authorization
Webhook Tools support multiple authentication types:
- Public (no auth)
- Custom API Key
- Bearer Token
- Service Account / Secret
- Custom Headers
All credentials are stored securely and never exposed to the user.
Example header:
x-api-key: {{api_key}}
Authorization fields help secure internal company APIs or restricted endpoints.
9.6 Parameters (Query Parameters)
Parameters are appended to the Webhook URL dynamically.
Example configuration:
| Key | Value |
|---|---|
| latitude | 28.61 |
| longitude | 77.23 |
| hourly | pm10 |
Resulting final URL:
https://air-quality-api.open-meteo.com/v1/air-quality?latitude=28.61&longitude=77.23&hourly=pm10
You can also use dynamic values from the conversation:
{{extracted_city}}
{{latitude}}
{{longitude}}
9.7 Headers
Headers allow custom metadata to be sent along with the request.
Common headers:
Content-Type: application/json
Authorization: Bearer {{token}}
x-api-key: {{api_key}}
Headers are essential for authenticated APIs.
9.8 POST Body (For POST Requests Only)
POST Webhooks allow you to send a JSON body.
Example:
{
  "city": "{{user_city}}",
  "requested_by": "{{customer_name}}",
  "mobile": "{{customer_number}}"
}
You can include any number of dynamic or static fields.
9.9 Webhook Messages
Webhook Tools can define optional system messages that the assistant will use depending on execution results.
Success Message
Used when API response is valid.
Example:
Fetched the AQI information successfully.
Error Message
Displayed when:
- The API is unreachable
- Timeout occurs
- Response format is invalid
- Error code is returned
Example:
Sorry, I couldn’t fetch the AQI right now. Please try again later.
9.10 Response Mapping
Once the API returns a JSON response, you must map specific fields into assistant context variables.
Example API response:
{
  "hourly": {
    "pm10": [142],
    "pm2_5": [88]
  }
}
Your mappings may be:
hourly.pm10[0]→pm10_valuehourly.pm2_5[0]→pm25_value
These variables become available for:
- Prompts
- Edge conditions
- Next tool calls
- Decision logic
9.11 Full Webhook Example (AQI for Delhi)
Tool Name: aqidelhi
Method: GET
URL:
https://air-quality-api.open-meteo.com/v1/air-quality
Parameters:
| Key | Value |
|---|---|
| latitude | 28.61 |
| longitude | 77.23 |
| hourly | pm10,pm2_5 |
Output Mapping:
hourly.pm10[0]→pm10_valuehourly.pm2_5[0]→pm25_value
Success Message:
Delhi PM10 is {{pm10_value}} and PM2.5 is {{pm25_value}}.
Flow Usage Example:
Action Node → aqidelhi
→ Returns pm10_value, pm25_value
→ Next Node states the air quality summary
9.12 Webhook Best Practices
- Test the tool using Run Tool before adding to pathways
- Ensure JSON paths are correct for output mapping
- Validate the format of dynamic parameters
- Do not expose API keys directly — use credentials
- Set timeouts for unstable external APIs
- Add fallback messages for network failures
- Use dynamic parameters to avoid hardcoding
- Keep parameter names consistent
- Add retries for critical tools
- Ensure your API returns valid JSON
Webhook Tools offer the simplest and fastest way to connect any external HTTP service with your Voicing AI assistant.
10. Call Details Tool Template (Post-Call)
The Call Details tool template is designed for post-call automation. Unlike Webhook tools that run during a live conversation inside a Pathway, a Call Details tool runs after the call ends — typically attached to the assistant’s Post-Call Analysis prompt as a Post Call Tool.
When configured, Voicing AI sends a POST request to your URL with the full call record: transcripts, recording path, extracted output fields, status, and other metadata from the platform’s calls table. Your backend receives everything it needs to update CRM, billing, collections, or internal dashboards without polling the API Flow Get Call Details endpoint separately.
10.1 When to use Call Details vs other options
| Approach | When to use |
|---|---|
| Call Details tool (POST to your URL) | Push call data to your system automatically when every call ends |
| API Flow GET Get Call Details | Your system pulls call data on demand using call_id |
| Webhook tool in Pathway | Call an API during the conversation, not after disconnect |
Use the Call Details template when you want a fire-and-forget webhook after post-call analysis completes — for example, sending disposition, amount, and summary to a collections platform.
10.2 End-to-end flow
sequenceDiagram
  participant User
  participant Assistant
  participant Platform as Voicing AI Platform
  participant Analysis as Post-Call Analysis
  participant Tool as Call Details Tool
  participant API as Your API URL

  User->>Assistant: Live call
  Assistant->>Platform: Call completes / disconnects
  Platform->>Analysis: Run analysis prompt
  Analysis->>Analysis: Extract output variables
  Platform->>Tool: Invoke post-call tool
  Tool->>API: POST call details payload
  API-->>Tool: 200 OK (your response)
Steps in plain language:
- The call ends (disconnect or completion).
- The Post-Call Analysis prompt runs (if configured) and extracts fields such as call outcome, amount, or date/time.
- Each Post Call Tool attached to that prompt runs according to its Call Disconnect Trigger (commonly
Always). - The Call Details tool POSTs the call record to the URL you configured.
- Your API processes the payload and returns a response (Voicing AI stores execution results for observability).
10.3 Creating a Call Details tool
- Open Tools in the left sidebar.
- Click Create Tool (or edit an existing tool).
- Under Tool Templates, select Call Details.
- Fill in basic information and API configuration.
- Save the tool.
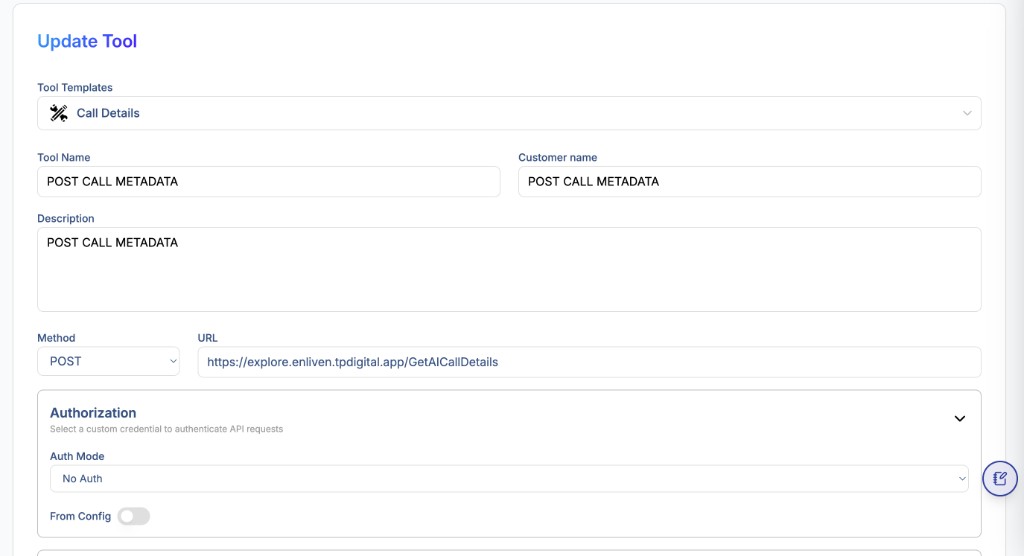
Fields you configure
| Field | Description |
|---|---|
| Tool Template | Must be Call Details |
| Tool Name | Unique name in your workspace (e.g. POST CALL METADATA) |
| Customer name | Grouping label for the tool (often matches tool name or client) |
| Description | What the tool does — shown when selecting post-call tools |
| Method | Fixed to POST for Call Details tools |
| URL | Your endpoint that receives call details after each qualifying call |
| Authorization | Auth mode for your API (No Auth, API key, Bearer token, etc.) |
| From Config | Optional toggle to pull URL or auth from workspace config when enabled |
Example configuration:
| Field | Example value |
|---|---|
| Tool Name | POST CALL METADATA |
| Customer name | POST CALL METADATA |
| Description | POST CALL METADATA |
| Method | POST |
| URL | https://your-domain.example/GetAICallDetails |
| Auth Mode | No Auth (or your preferred credential type) |
Your URL must accept POST requests and return valid JSON (or the status code your integration expects). Test the endpoint with a sample payload before attaching it to production assistants.
10.4 Attaching Call Details to Post-Call Analysis
After creating the tool, attach it on the Assistant → Post-Call Analysis screen.
- Open your assistant and go to Post-Call Analysis.
- Configure the Post-Call Analysis Prompt and Output Prompt Variables (fields the model should extract from the transcript).
- In Post Call Tools, choose your Call Details tool from Choose a tool to add… (or create a new one via Tools).
- Set Call Disconnect Trigger —
Alwaysruns the tool on every completed call that matches the trigger rules. - Save the assistant.
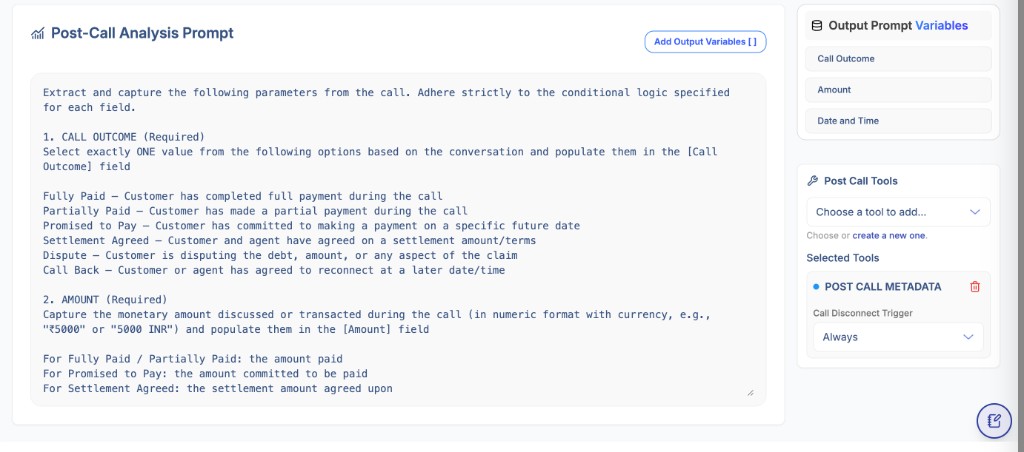
In the example above:
- Output Prompt Variables include
Call Outcome,Amount, andDate and Time. - Post Call Tools lists
POST CALL METADATA(a Call Details tool) with disconnect trigger Always.
Extracted variables from the analysis prompt are included in the call payload (under fields such as call_output_extracted) so your API receives both raw call data and structured post-call extraction.
For more on post-call execution order and panel behavior, see Post-Call Analysis → Post-Call Tools in the Assistants guide.
10.5 What your API receives (call details payload)
When the Call Details tool runs, Voicing AI POSTs data representing one row from the platform calls table, enriched with post-call extraction. Exact fields depend on your assistant and telephony setup, but a typical payload includes:
{
  "id": "019e2a1f-c0d4-7962-a8a4-d4421e8dde19",
  "phone_number": "+917011812582",
  "status": "completed",
  "call_transcripts": [
    { "role": "user", "content": "Hi" },
    { "role": "assistant", "content": "Hello, how can I help you today?" }
  ],
  "call_recording_path": "users/public/callrecordings/.../file.wav",
  "call_output_extracted": {
    "customer_name": "Bidhu",
    "call_summary": "...",
    "Call Outcome": "Promised to Pay",
    "Amount": "5000",
    "Date and Time": "2026-06-11T10:00:00Z"
  }
}
| Field | Meaning |
|---|---|
id | Unique call ID (same as call_id in API Flow) |
phone_number | Destination or caller number (E.164 when available) |
status | Call lifecycle status (e.g. completed) |
call_transcripts | Full conversation transcript array |
call_recording_path | Storage path to the call recording file |
call_output_extracted | Structured fields from post-call analysis and extract configuration |
Additional fields may be present (timestamps, assistant ID, campaign ID, duration, telephony metadata). Design your endpoint to accept extra keys without breaking.
Important: This is a push model — your server does not need to call GET Get Call Details if the Call Details post-call tool already delivers everything you need. You can still use API Flow for reconciliation, backfill, or systems that were not wired to the webhook.
10.6 Building your receiving endpoint
Your URL should:
- Accept POST with
Content-Type: application/json. - Validate authentication (API key, Bearer token, mTLS, etc.) if exposed on the public internet.
- Respond quickly (prefer async processing for heavy CRM writes).
- Return 2xx on success so the platform records a successful tool run.
- Be idempotent where possible — use
id(call ID) as a deduplication key if retries occur.
Minimal handler pseudocode:
app.post('/GetAICallDetails', async (req, res) => {
  const call = req.body;
  const callId = call.id;

  if (await alreadyProcessed(callId)) {
    return res.status(200).json({ status: 'duplicate_ignored' });
  }

  await saveToCRM({
    callId,
    phone: call.phone_number,
    outcome: call.call_output_extracted?.['Call Outcome'],
    amount: call.call_output_extracted?.Amount,
    transcript: call.call_transcripts,
    recordingPath: call.call_recording_path,
  });

  res.status(200).json({ status: 'ok' });
});
10.7 Call Details vs API Flow Get Call Details
| Call Details tool (POST) | API Flow GET Get Call Details | |
|---|---|---|
| Direction | Platform → your server | Your server → platform |
| Timing | Automatically after call + post-call analysis | Whenever you poll with call_id |
| Auth | Configured on the tool (URL credentials) | x-api-key on REST API |
| Payload | Full call row + call_output_extracted | API response for one call_id |
| Best for | Real-time downstream automation | Pull-based integrations, dashboards, batch jobs |
Many teams use both: Call Details for immediate CRM updates, and GET Get Call Details for nightly audits or missed webhook recovery.
10.8 Best practices for Call Details tools
- Name tools clearly — operators should recognize post-call webhooks in the assistant UI (e.g.
POST CALL METADATA → Enliven CRM). - Match extract field names — keys in
call_output_extractedfollow your Post-Call Analysis output variable names; keep them stable across releases. - Use
Alwayscarefully — every completed call hits your URL; ensure rate limits and database capacity can handle volume. - Secure the endpoint — even with
No Authin dev, use auth in production. - Log
id— correlate webhook payloads with Analytics call logs and API Flowcall_id. - Test with one assistant first — verify payload shape before rolling out to all campaigns.
- Handle failures — monitor tool execution in pathway/assistant logs; add alerting on non-2xx responses.
11. Error Handling & Retries
Tools support:
maxRetrytimeoutMs- Fallback edges
- Logging for debugging
Common errors:
- Invalid input
- Auth failure
- Server unavailable
- Tool returned empty output
Pathways should always include fallback handling.
12. Best Practices
- Keep inputs minimal
- Use typed fields
- Enable retries for external tools
- Avoid unnecessary API calls
- Log and monitor tool failures
- Use MCP tools for secure or custom logic
- Use Call Details tools for post-call push integrations; use API Flow GET for pull-based lookups
- Document tool behavior for your team
Summary
Tools extend your AI assistant with powerful capabilities.
MCP tools bring even more flexibility by allowing custom servers and advanced integrations.
Call Details tools push full call records to your API after post-call analysis — ideal for CRM, collections, and webhook-driven workflows.
With proper configuration — inputs, outputs, rules, MCP settings, and post-call Call Details URLs — tools become a core part of your intelligent voice workflows.
Last updated: 06/11/2026